Introduction
This guide explains how to connect the Session council information system (Ratsinformationssystem) to SpeechMind. The connection is established via the KI-Connector. Once it is set up, you can pull an existing session directly into SpeechMind when creating a new protocol, its agenda items (Tagesordnungspunkte) and participants (Teilnehmende) are imported automatically, without any manual entry.
The process has two parts:
- One-time setup (steps 1–3): an organisation admin creates the system configuration with your KI-Connector details.
- Using the integration (steps 4–7): any user can load a session into a new protocol.
Table of Contents
- Requesting your access data
- Opening the integrations page
- Creating the system configuration
- Loading a session into a new protocol
- Logging in to Session
- Selecting the session
- Reviewing and applying the session data
- Technical specifications
- Summary
1. Requesting Your Access Data
To connect your Session system, SpeechMind needs the URL of the KI-Connector as well as your instance number (Instanznummer). You receive these directly from your account manager (Kundenbetreuer) at Session.
- Contact your account manager at Session and ask for the KI-Connector Schnittstelle.
- You will receive the WebAPI-URL and your Instanznummer.
- Enter this access data in the following steps, the systems are then connected immediately.
📌 Note: The system configuration can only be created by an organisation admin.
2. Opening the Integrations Page
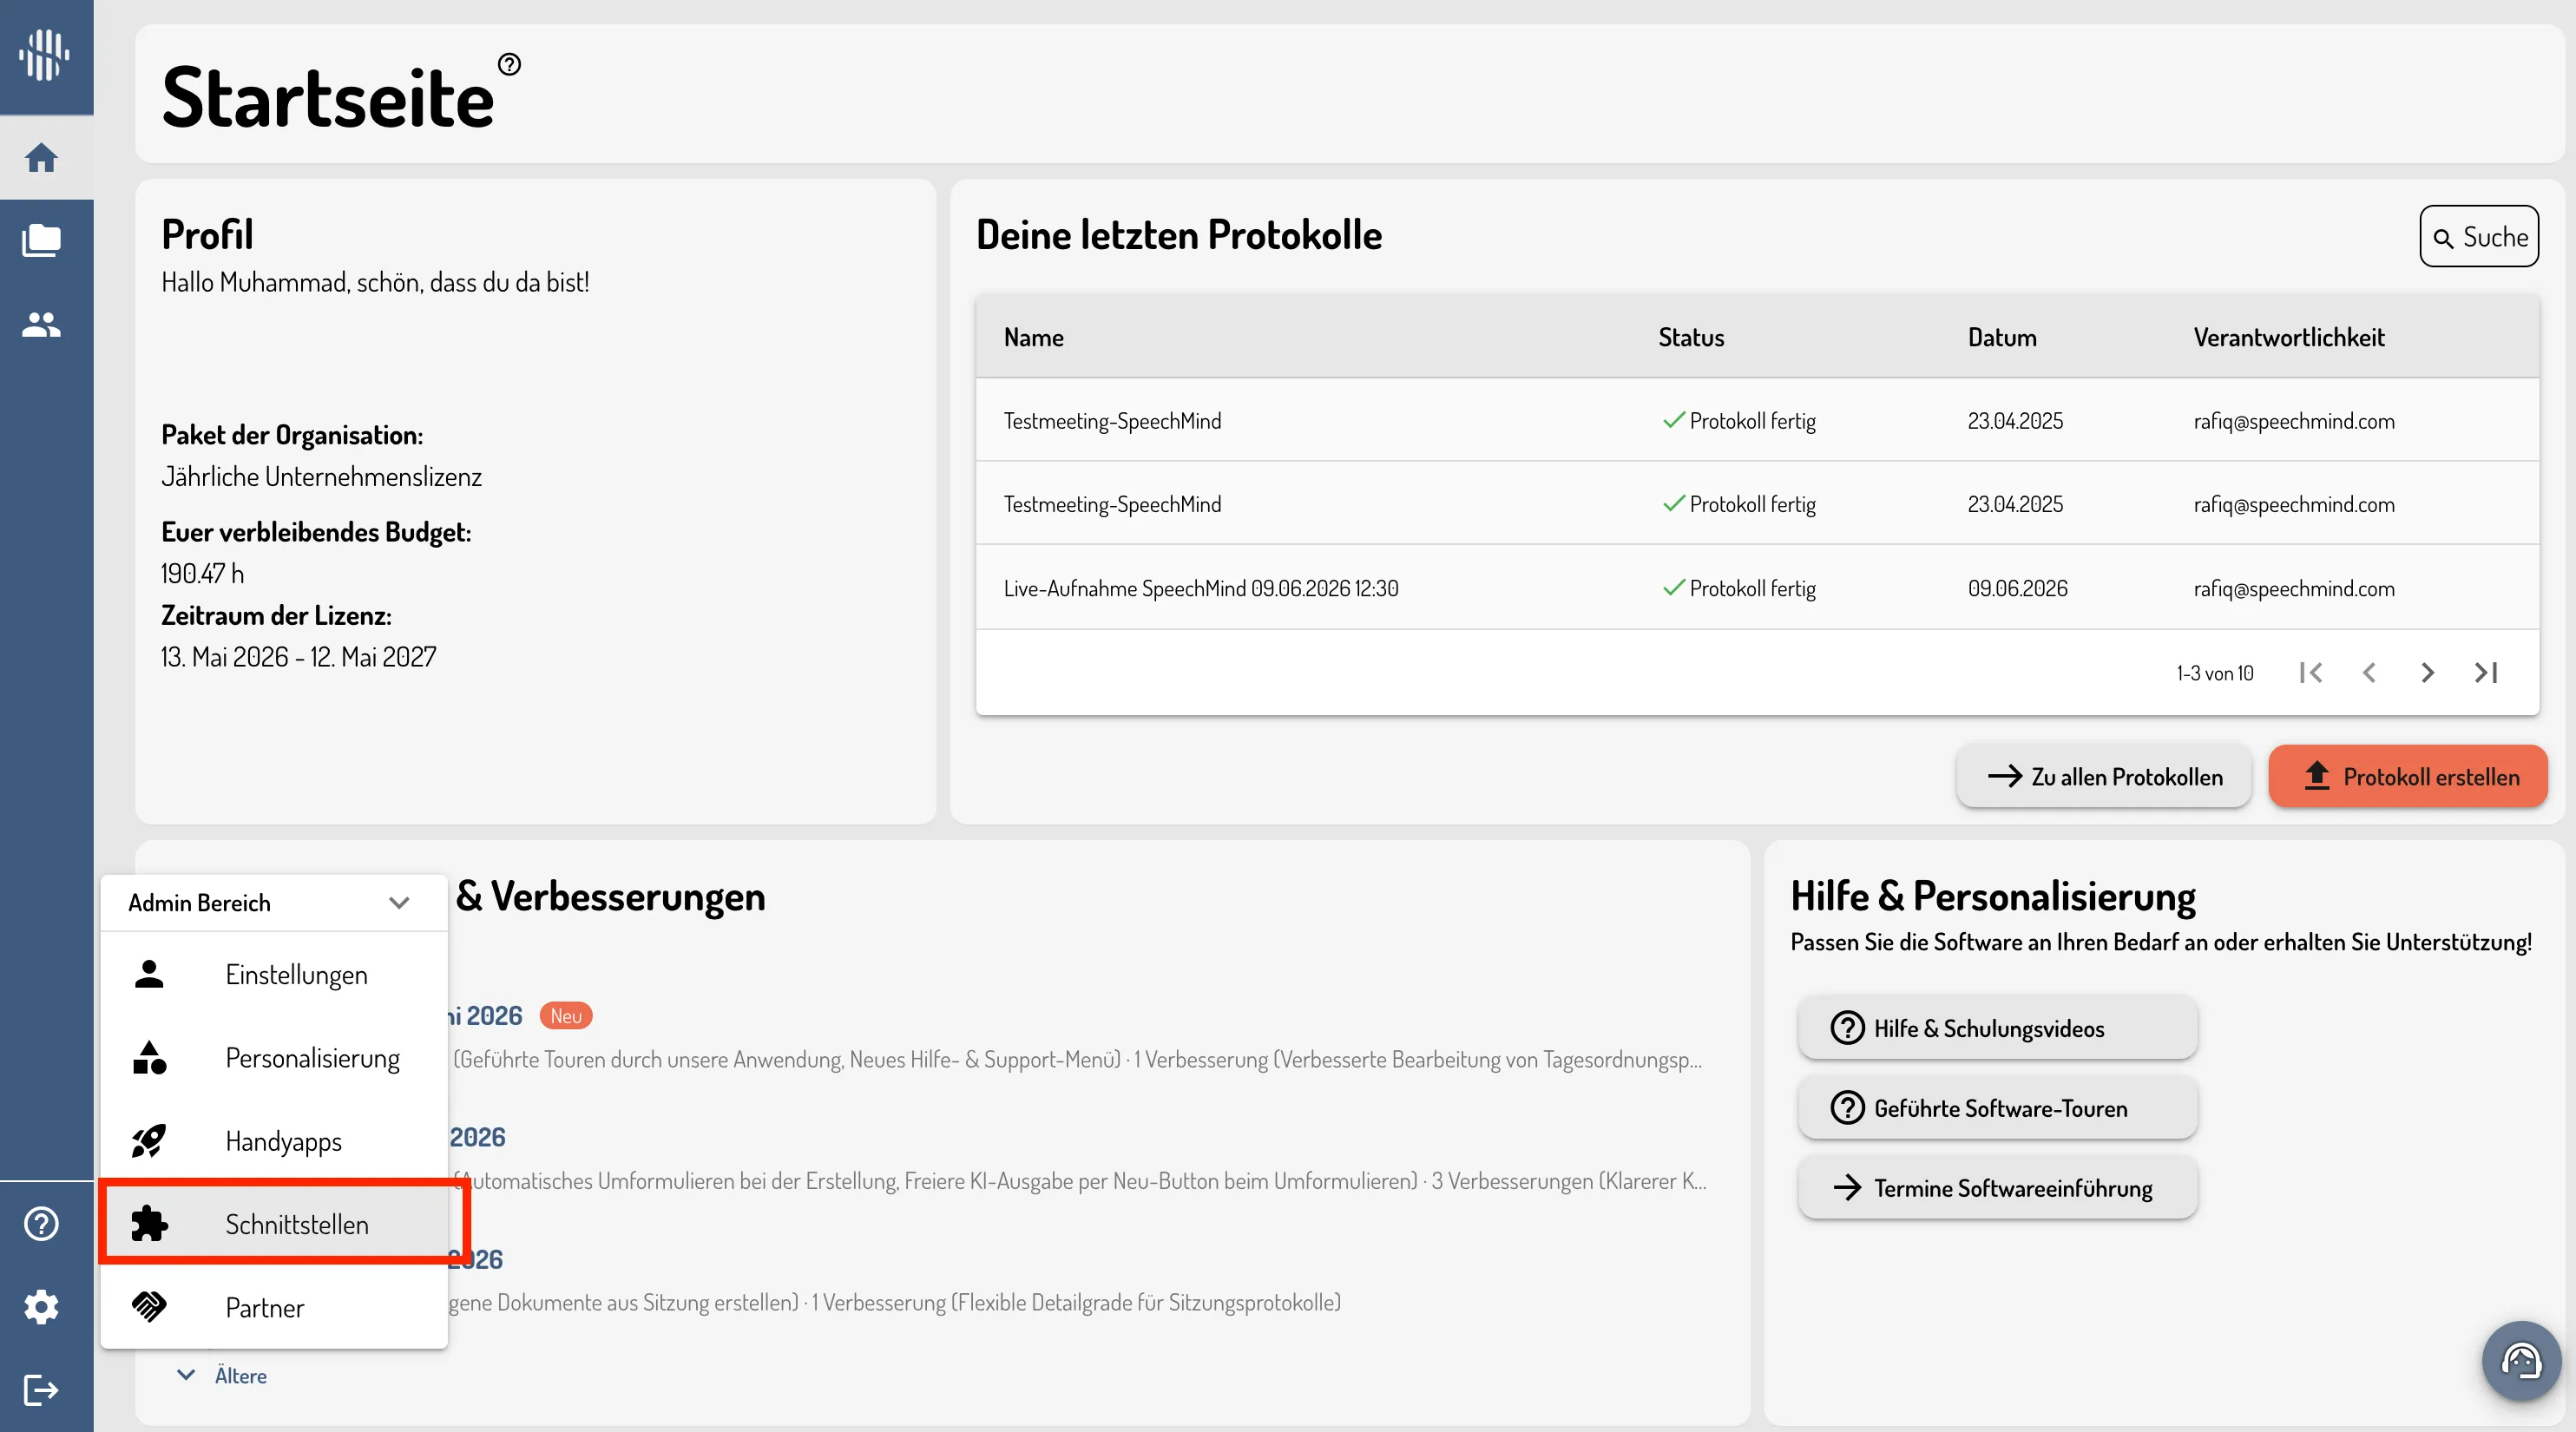
You start on the SpeechMind home page (Startseite). In the left-hand menu bar, click on the Settings icon and click on Schnittstellen.
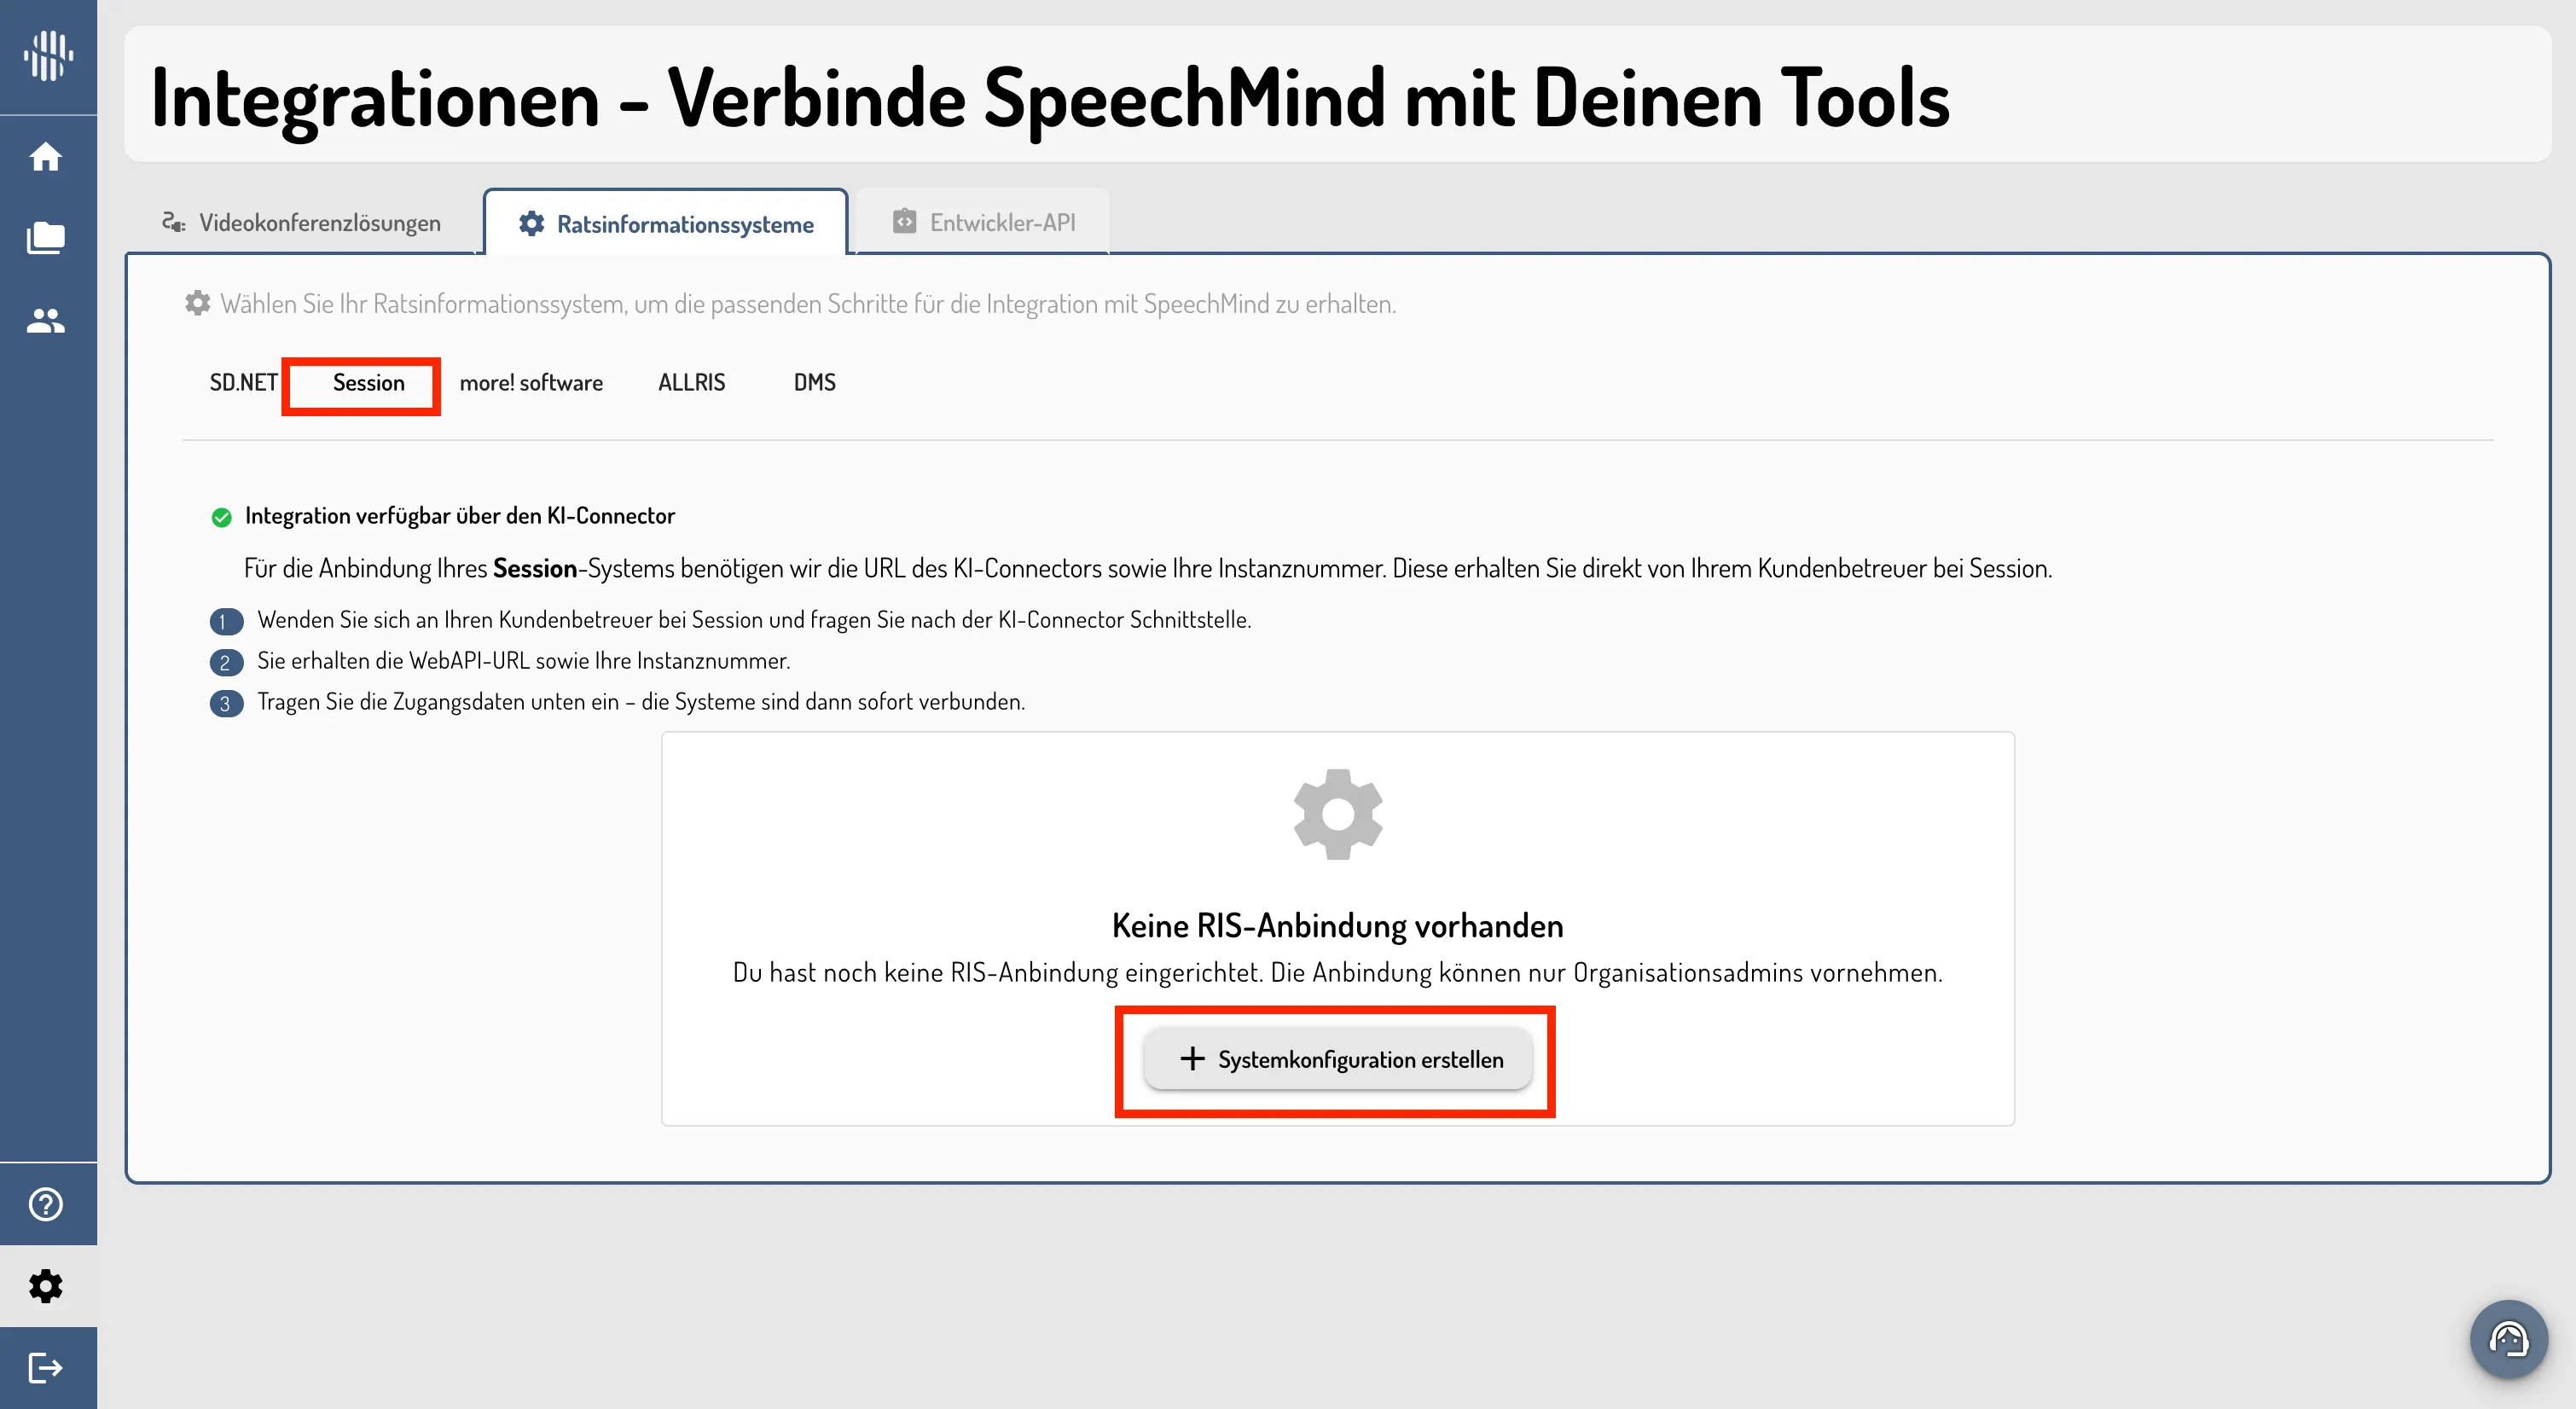
On the integrations page, open the Ratsinformationssysteme tab and select Session. You will see the note “Integration verfügbar über den KI-Connector” along with the required steps. Click on Systemkonfiguration erstellen.
3. Creating the System Configuration
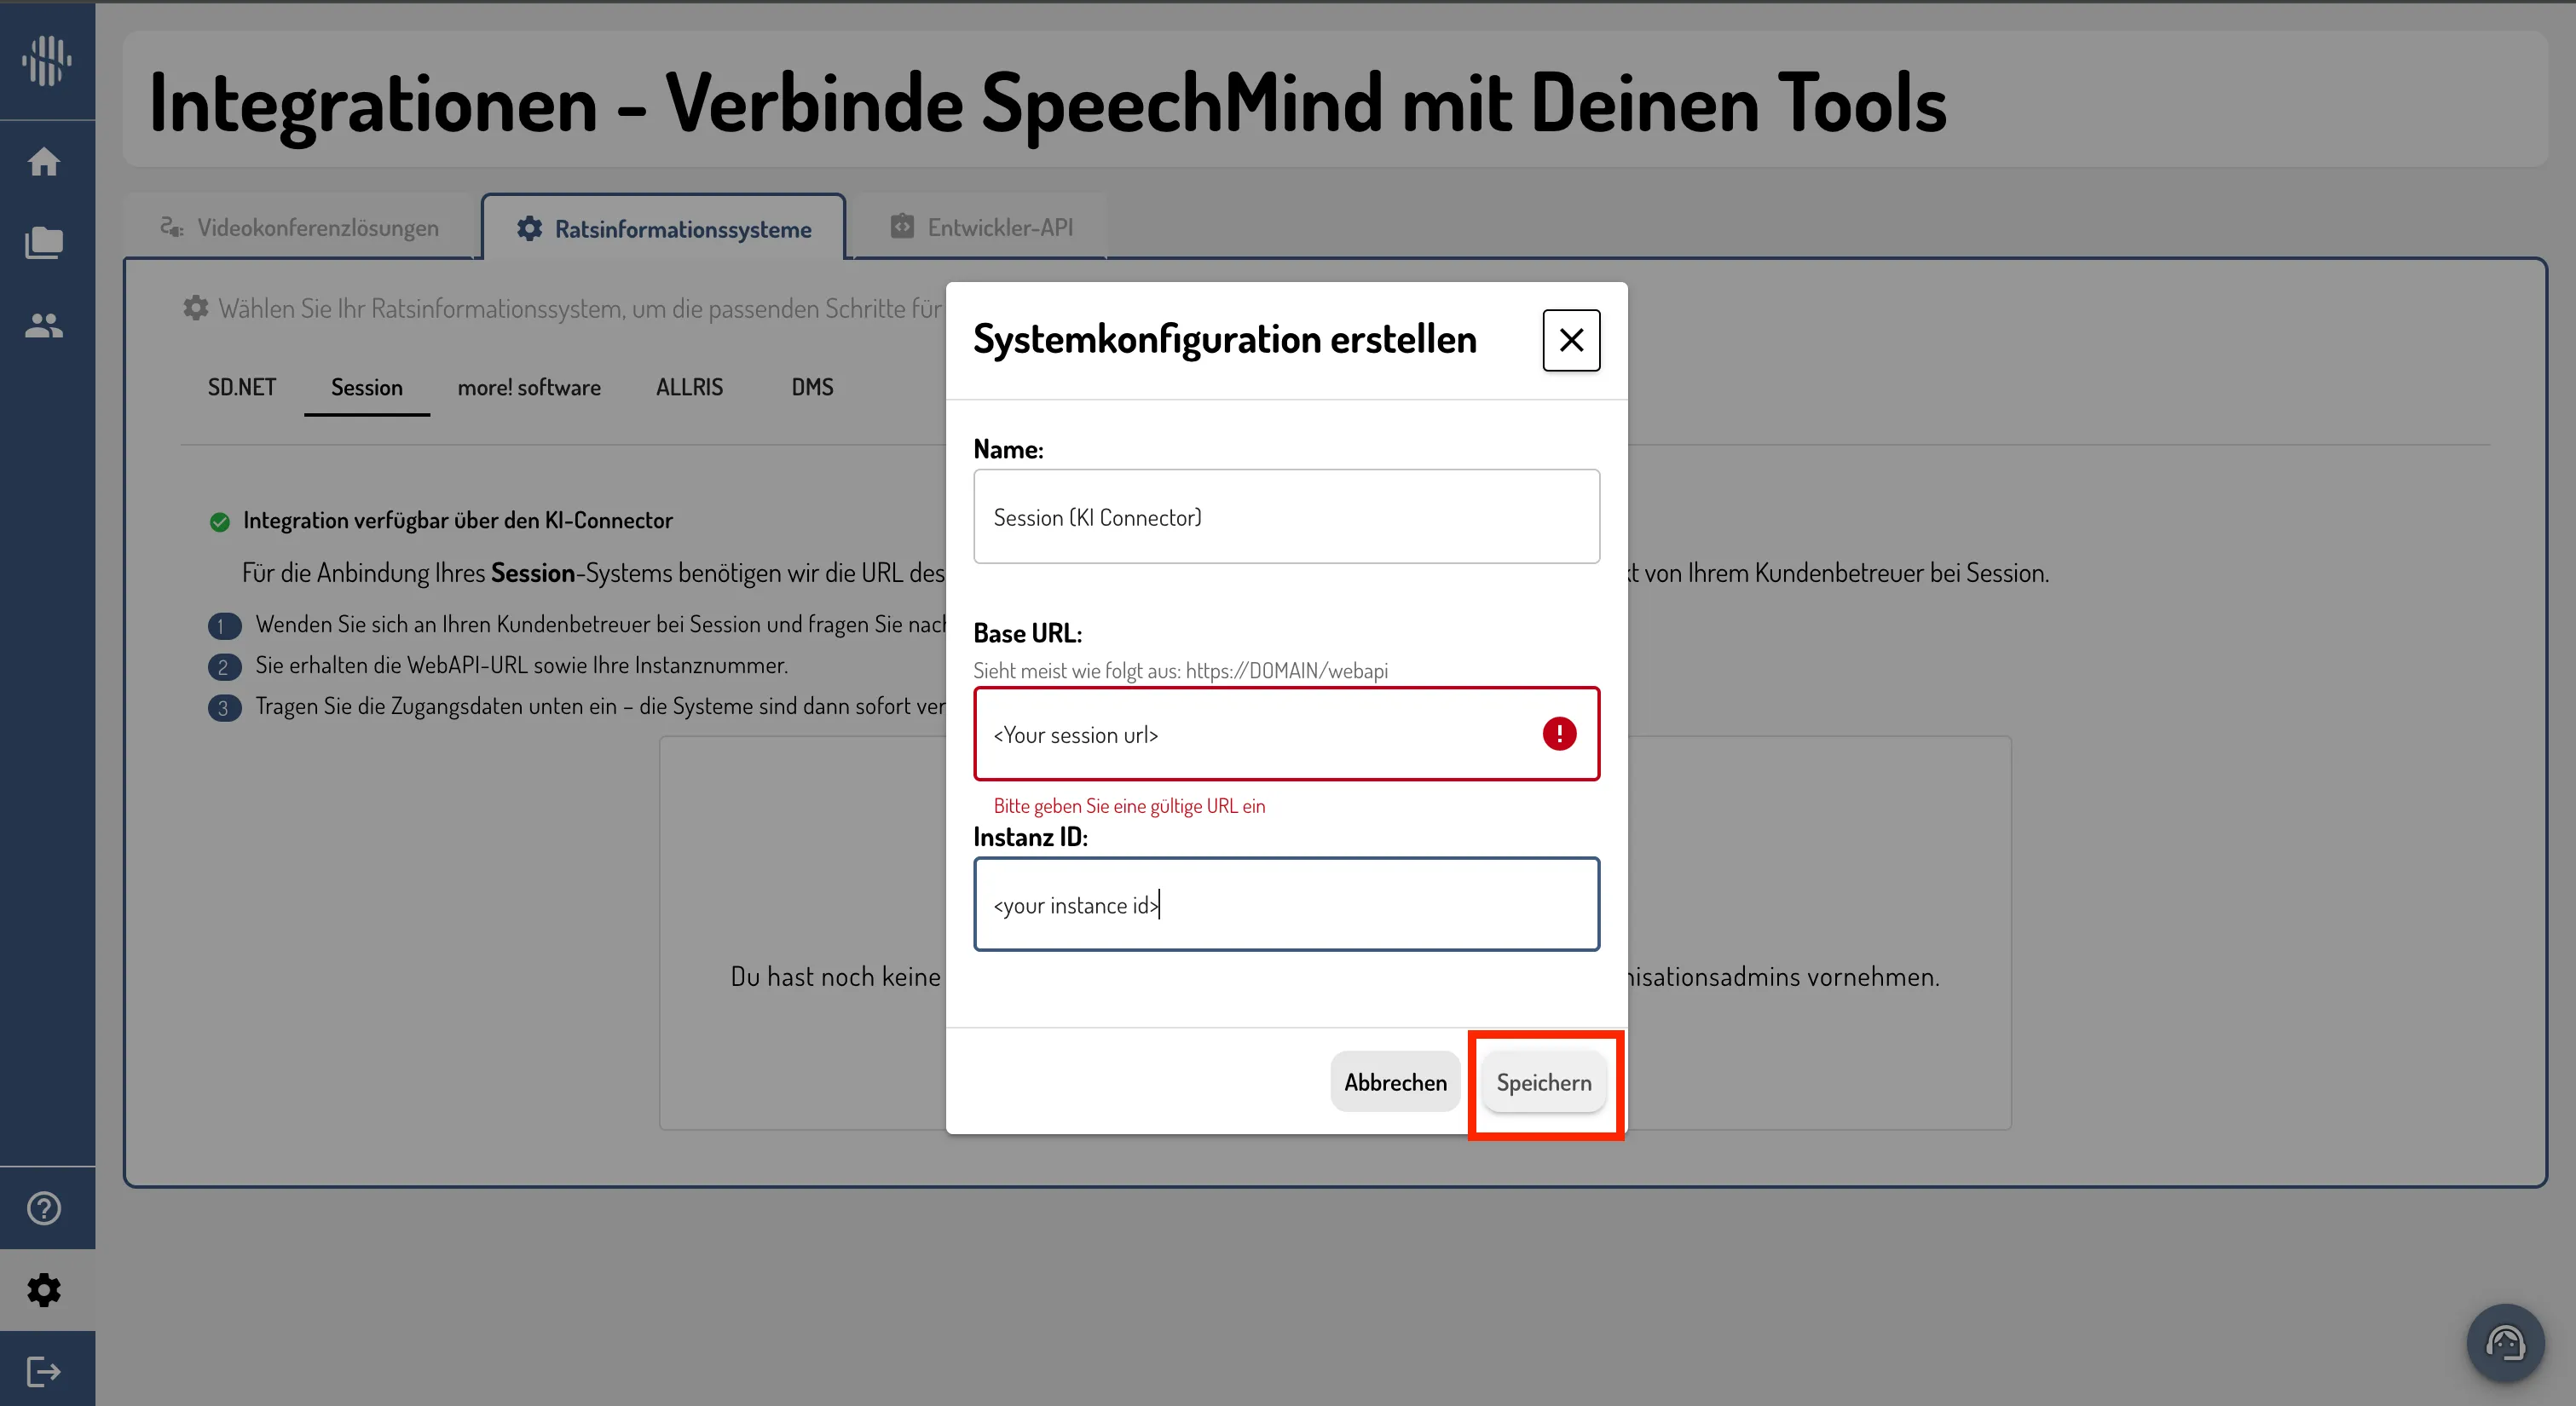
In the Systemkonfiguration erstellen dialog, enter your connection details:
- Name – a name for the configuration e.g. Session (KI Connector).
- Base URL – the WebAPI-URL you received from Session. It usually looks like
https://<your_domain>/webapi. - Instanz ID – your instance number (Instanznummer).
- Click Speichern to save the configuration.
4. Loading a Session into a New Protocol
Once the configuration is saved, you can import a session whenever you create a protocol.
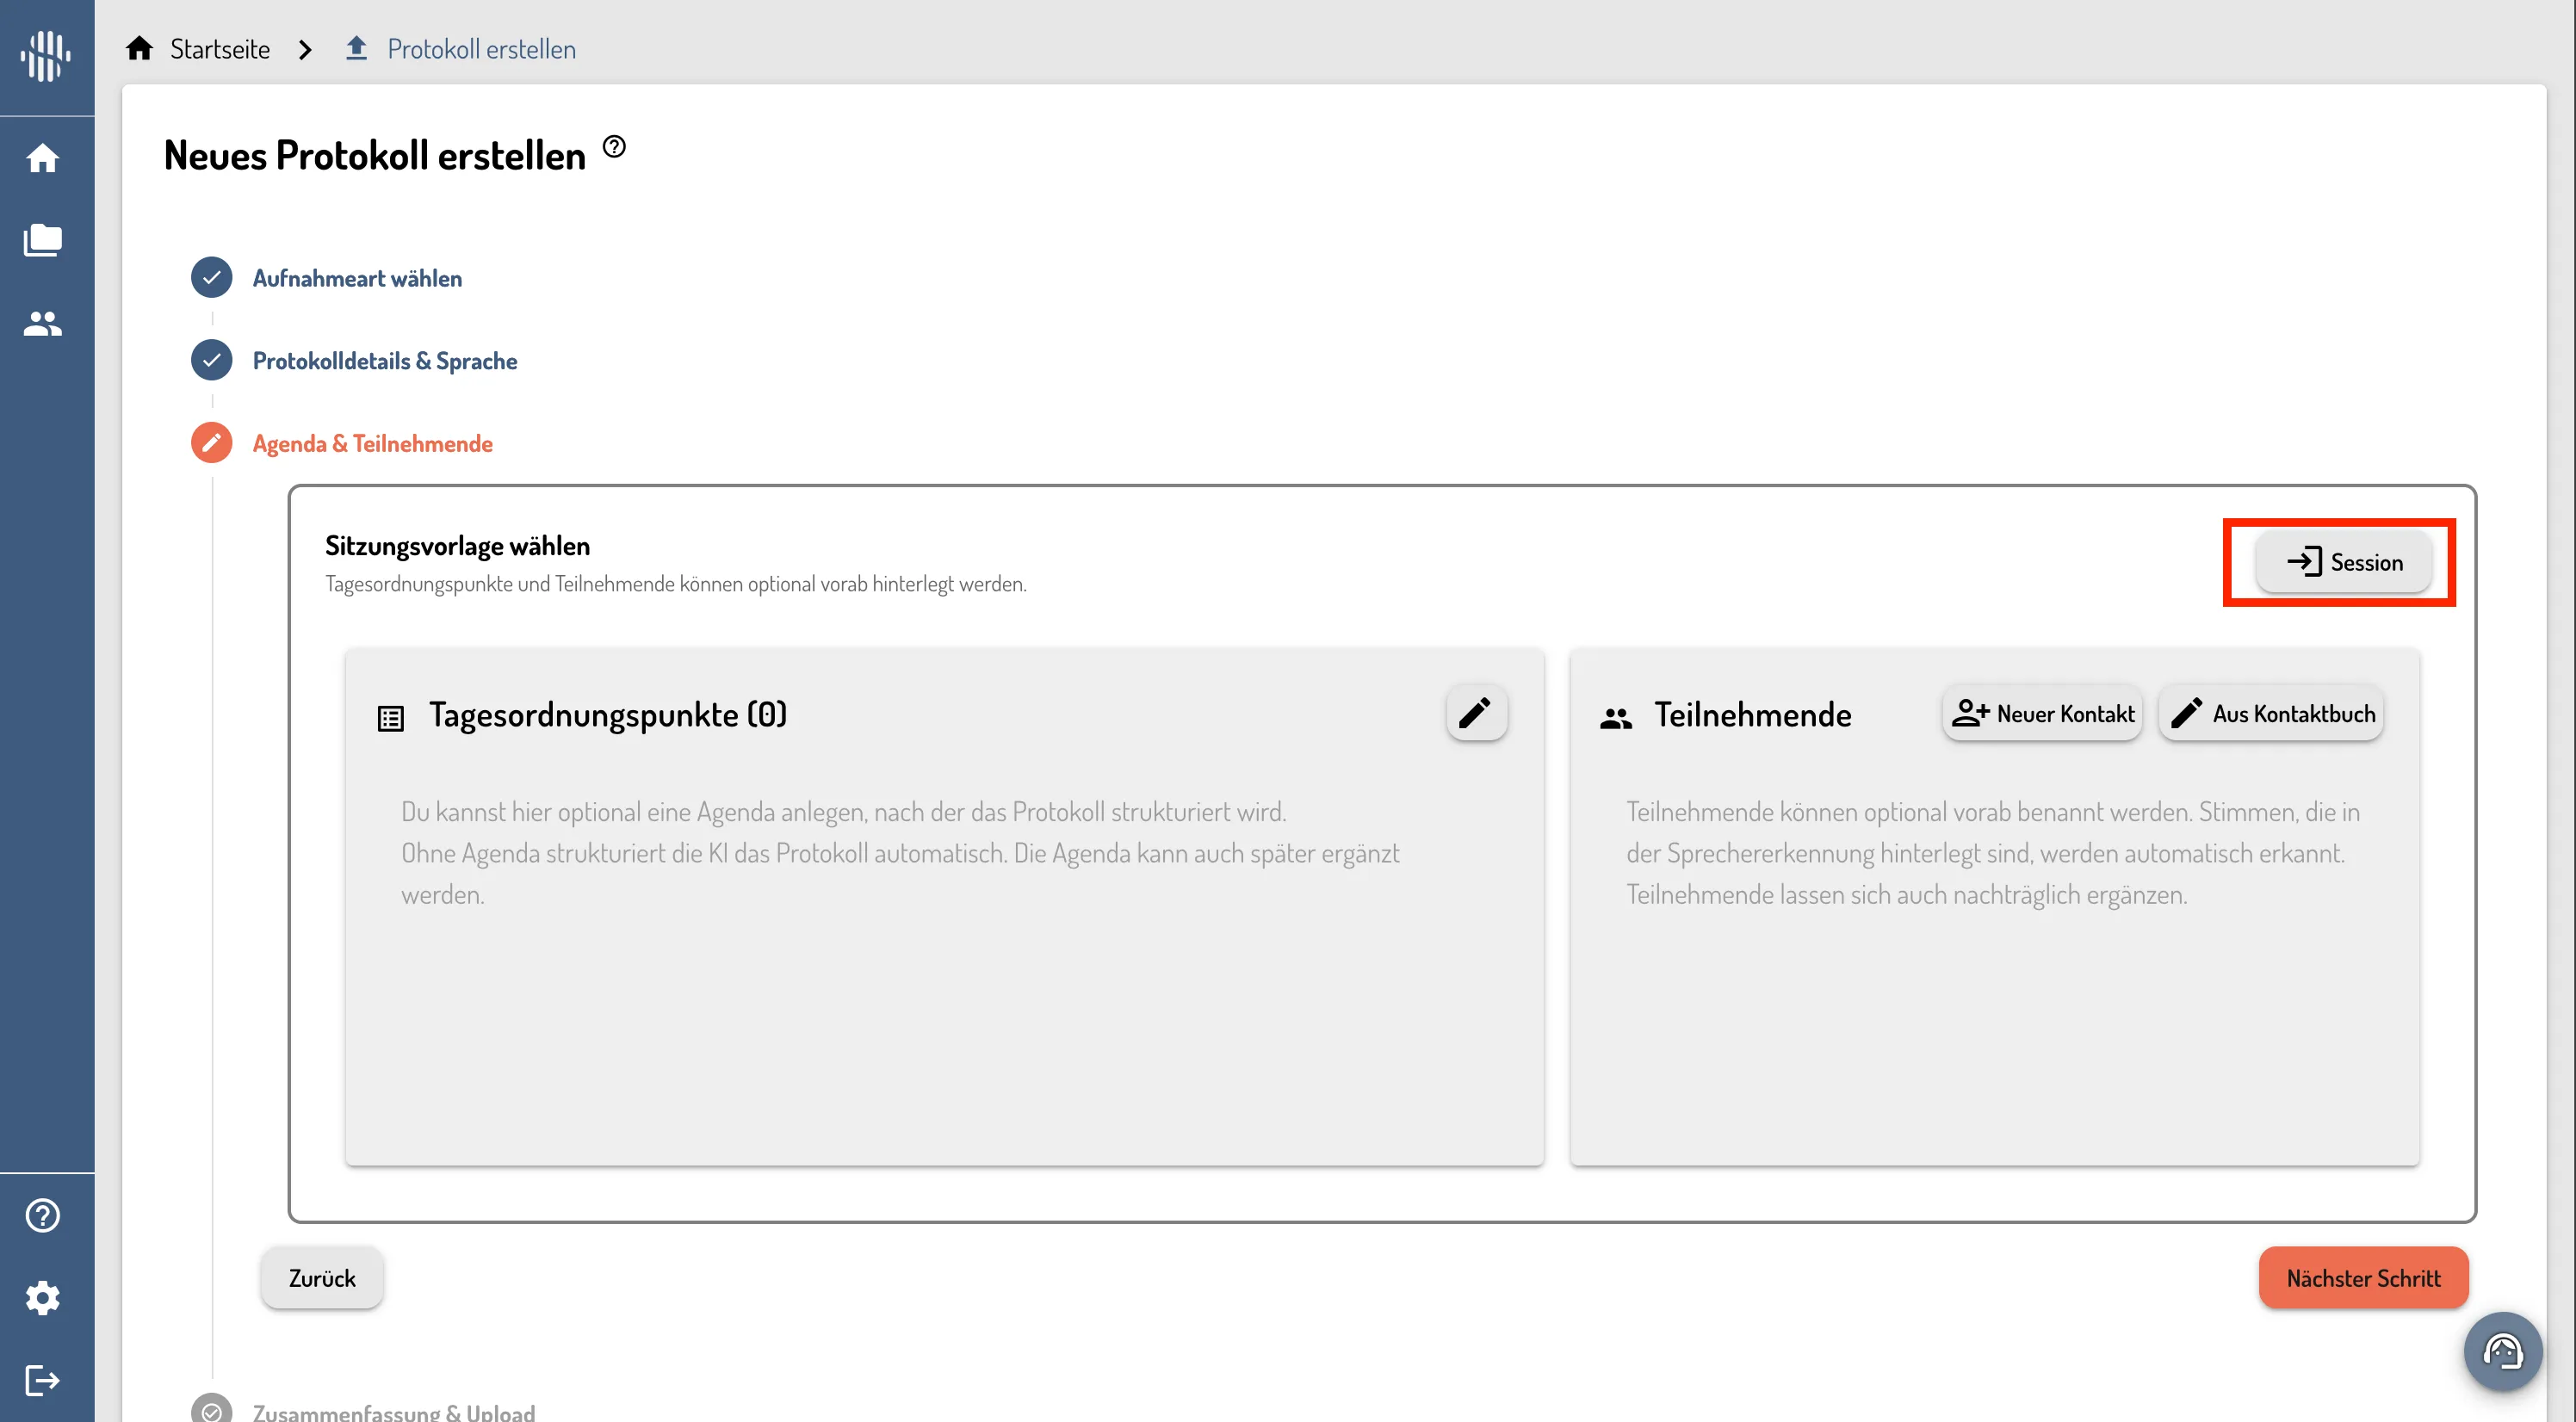
- Start a new protocol with Protokoll erstellen.
- Go through the steps until you reach Agenda & Teilnehmende.
- Under Sitzungsvorlage wählen, click the Session button.
5. Logging in to Session
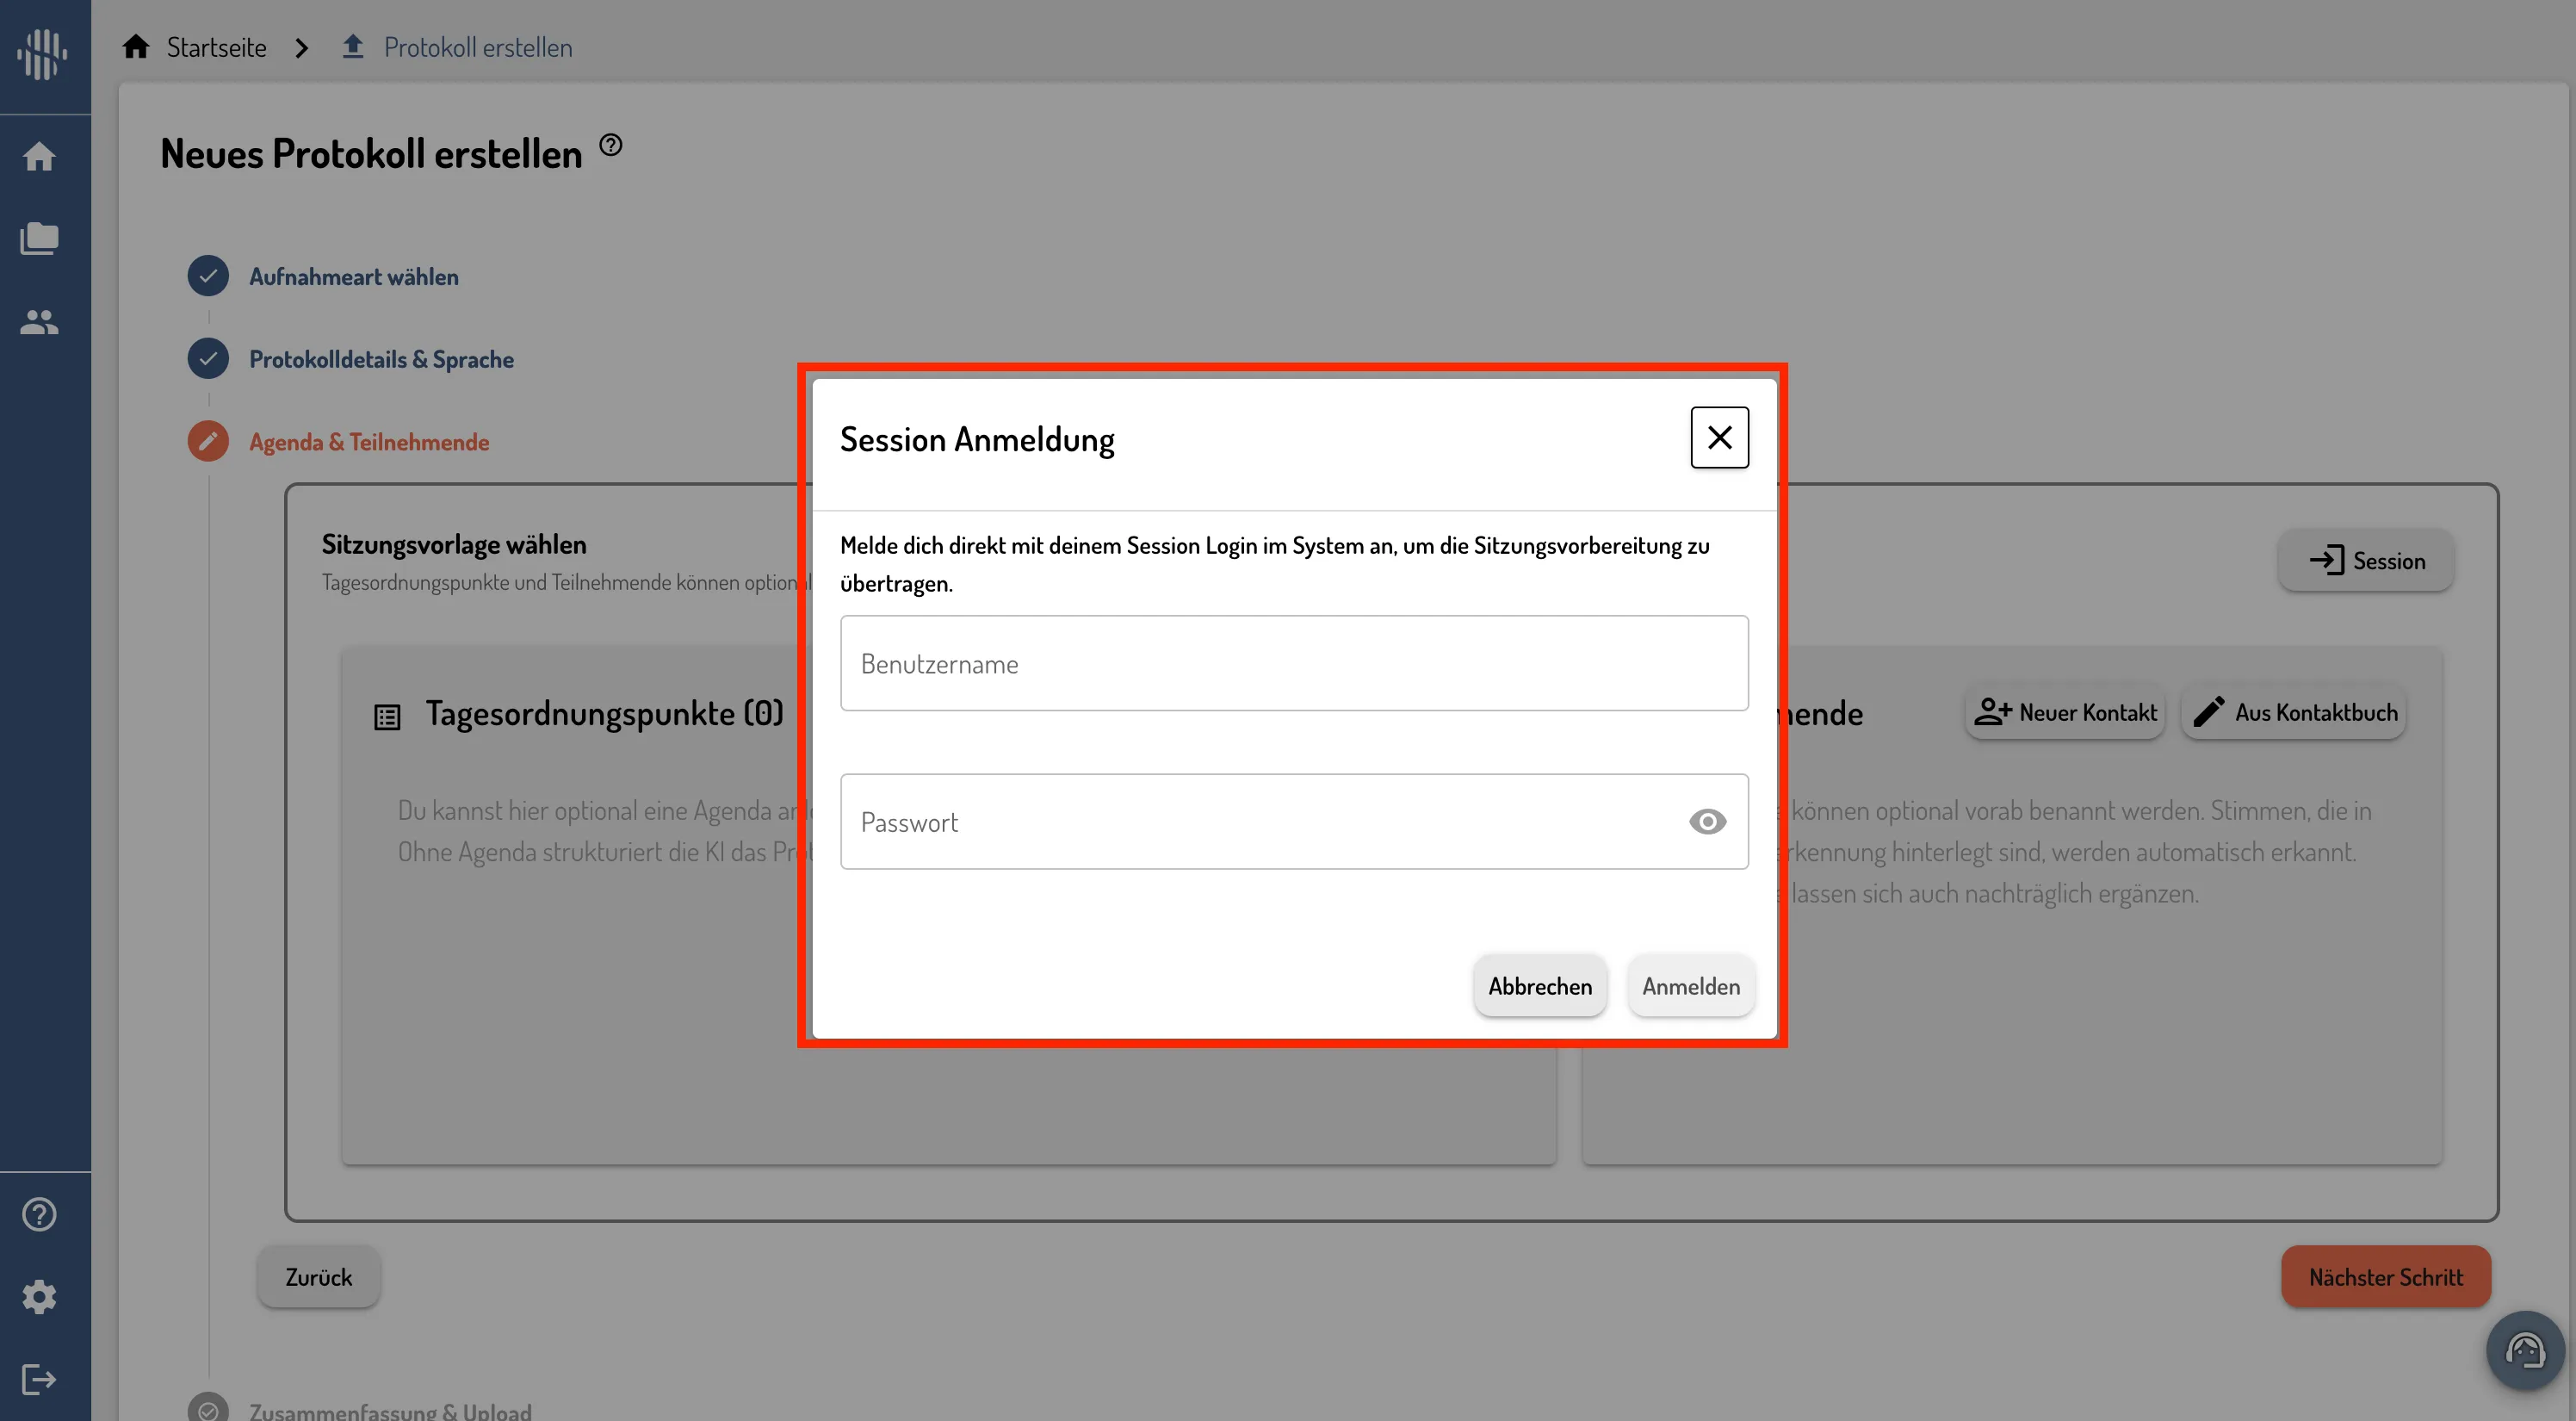
A Session Anmeldung dialog opens. Log in directly with your Session login to transfer the session preparation.
- Enter your Benutzername.
- Enter your Passwort.
- Click Anmelden.
6. Selecting the Session
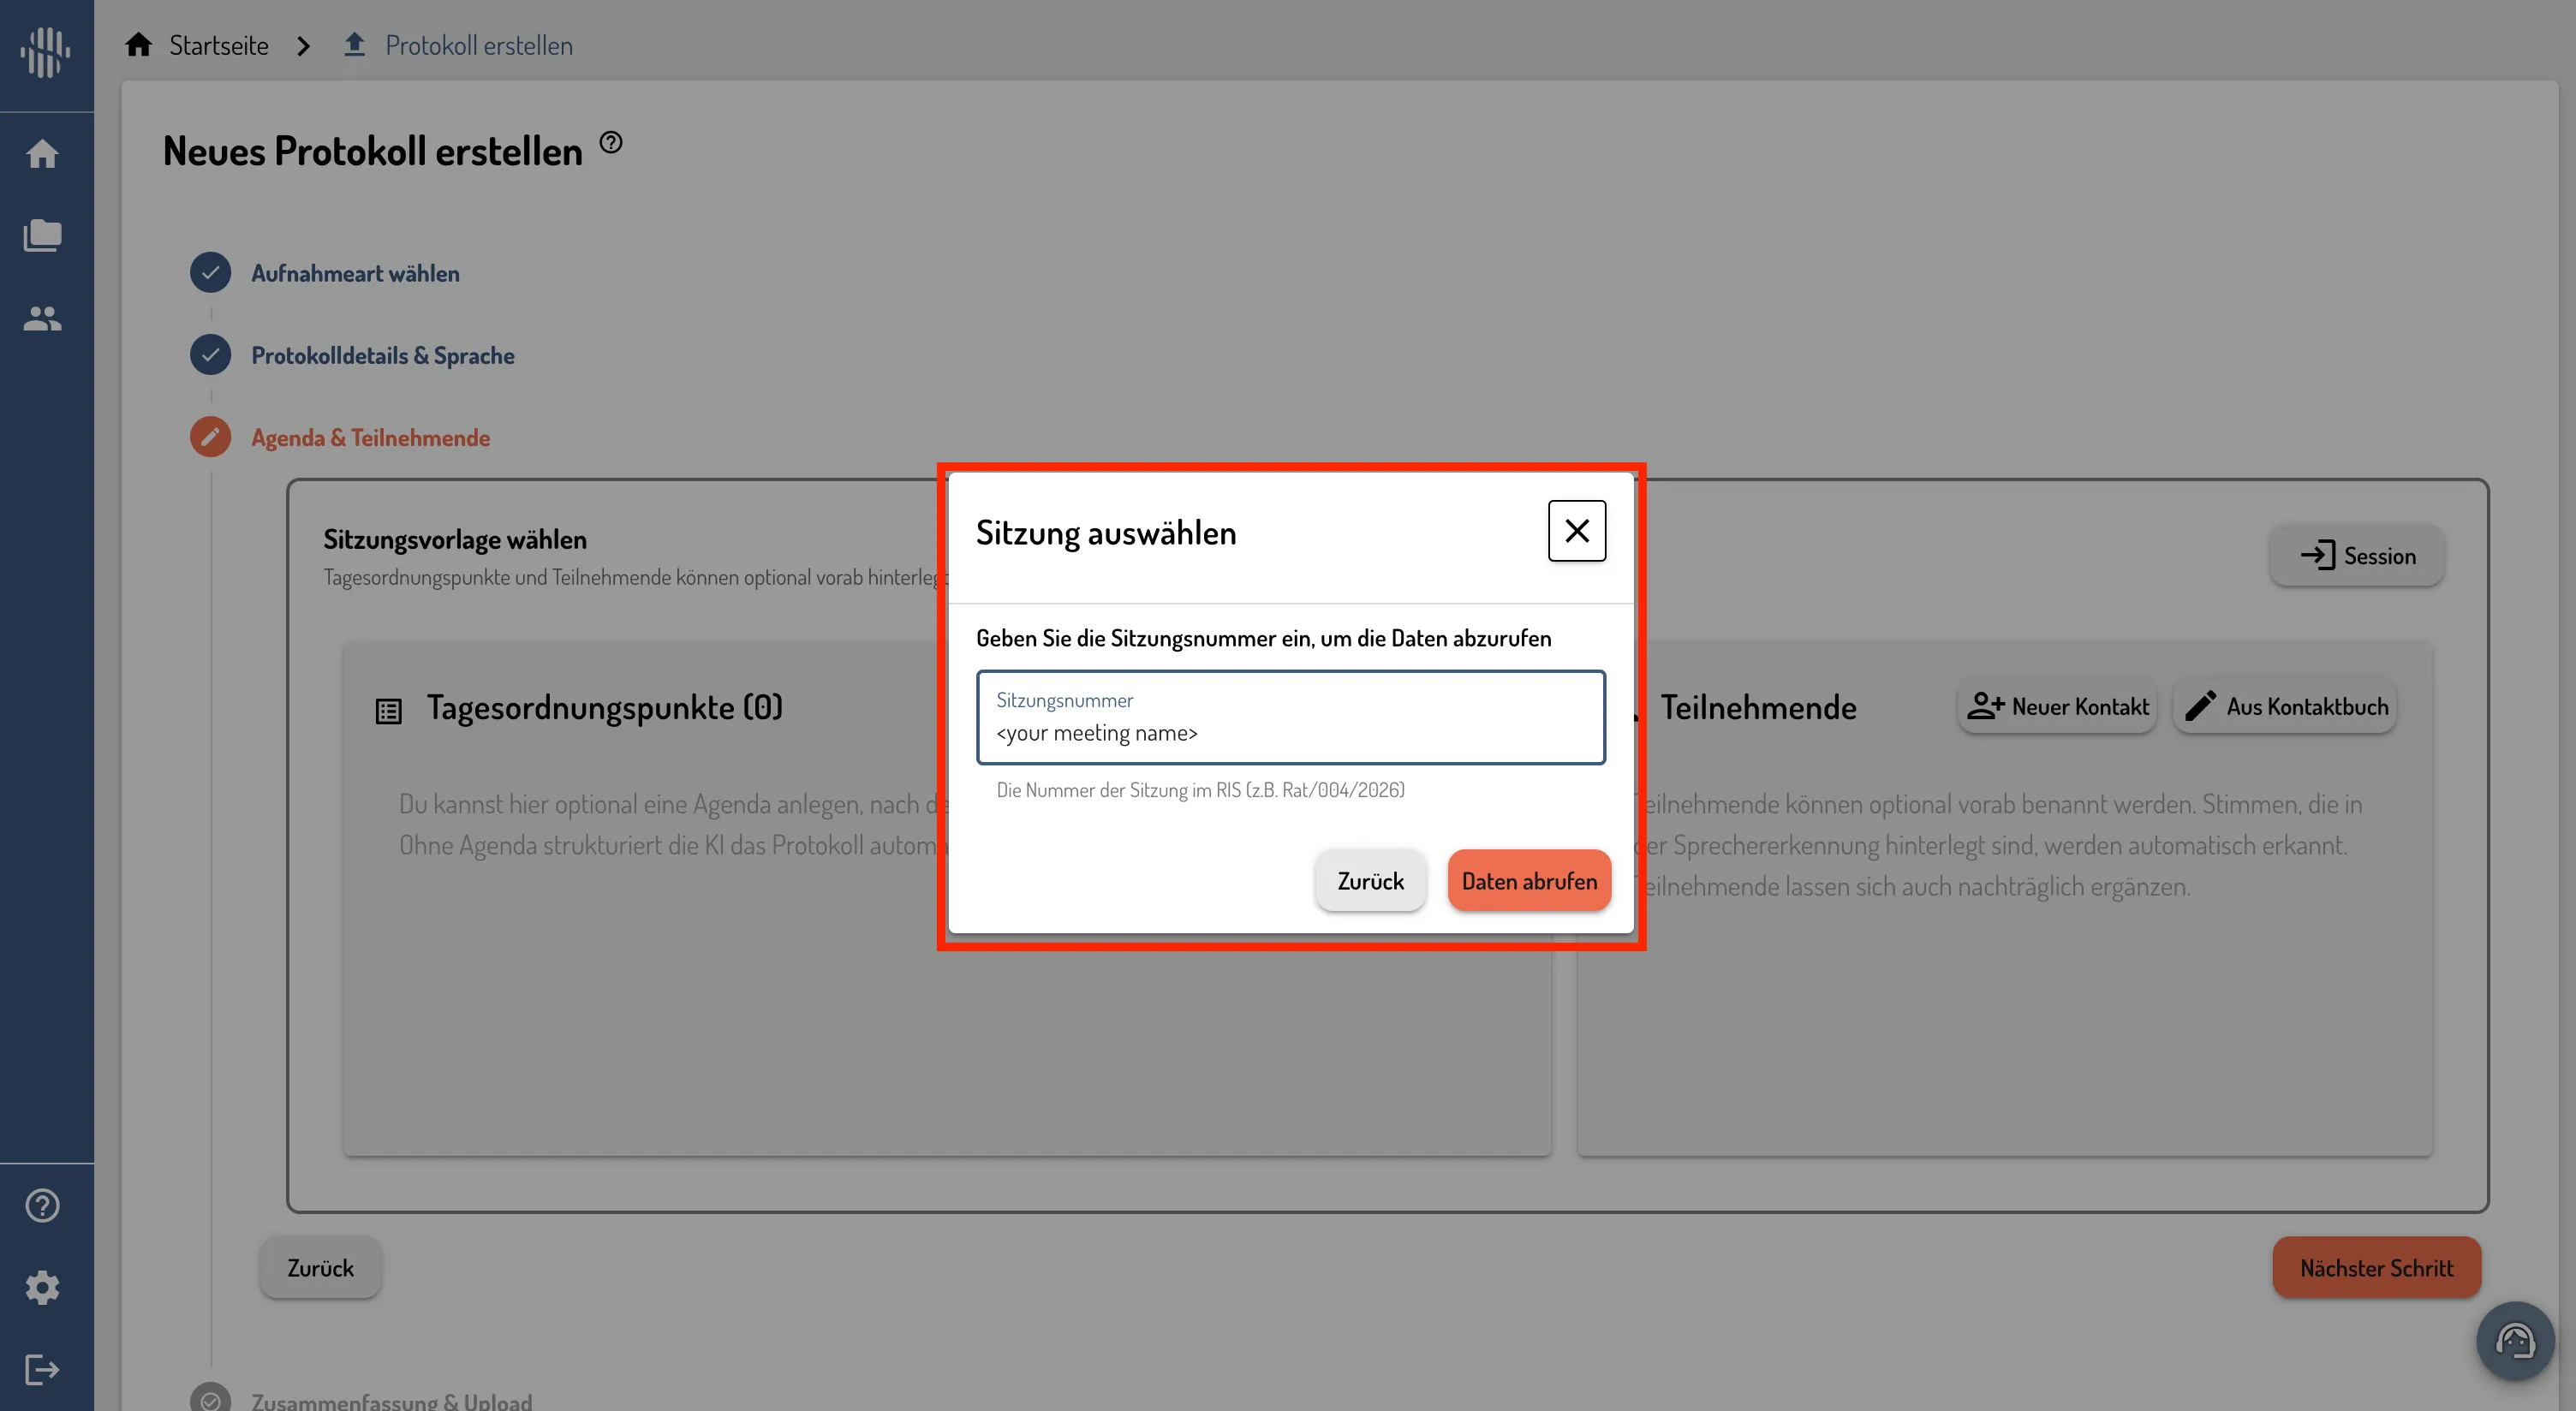
Next, choose which session to load in the Sitzung auswählen dialog.
- Enter the Sitzungsnummer, the number of the session in your RIS (e.g.
Rat/004/2026). - Click Daten abrufen to fetch the data.
7. Reviewing and Applying the Session Data
SpeechMind loads the selected session and shows its details, the Tagesordnungspunkte (agenda items) and Teilnehmende (participants).
- Review the imported agenda items and participants.
- Click Übernehmen to apply them to your protocol.
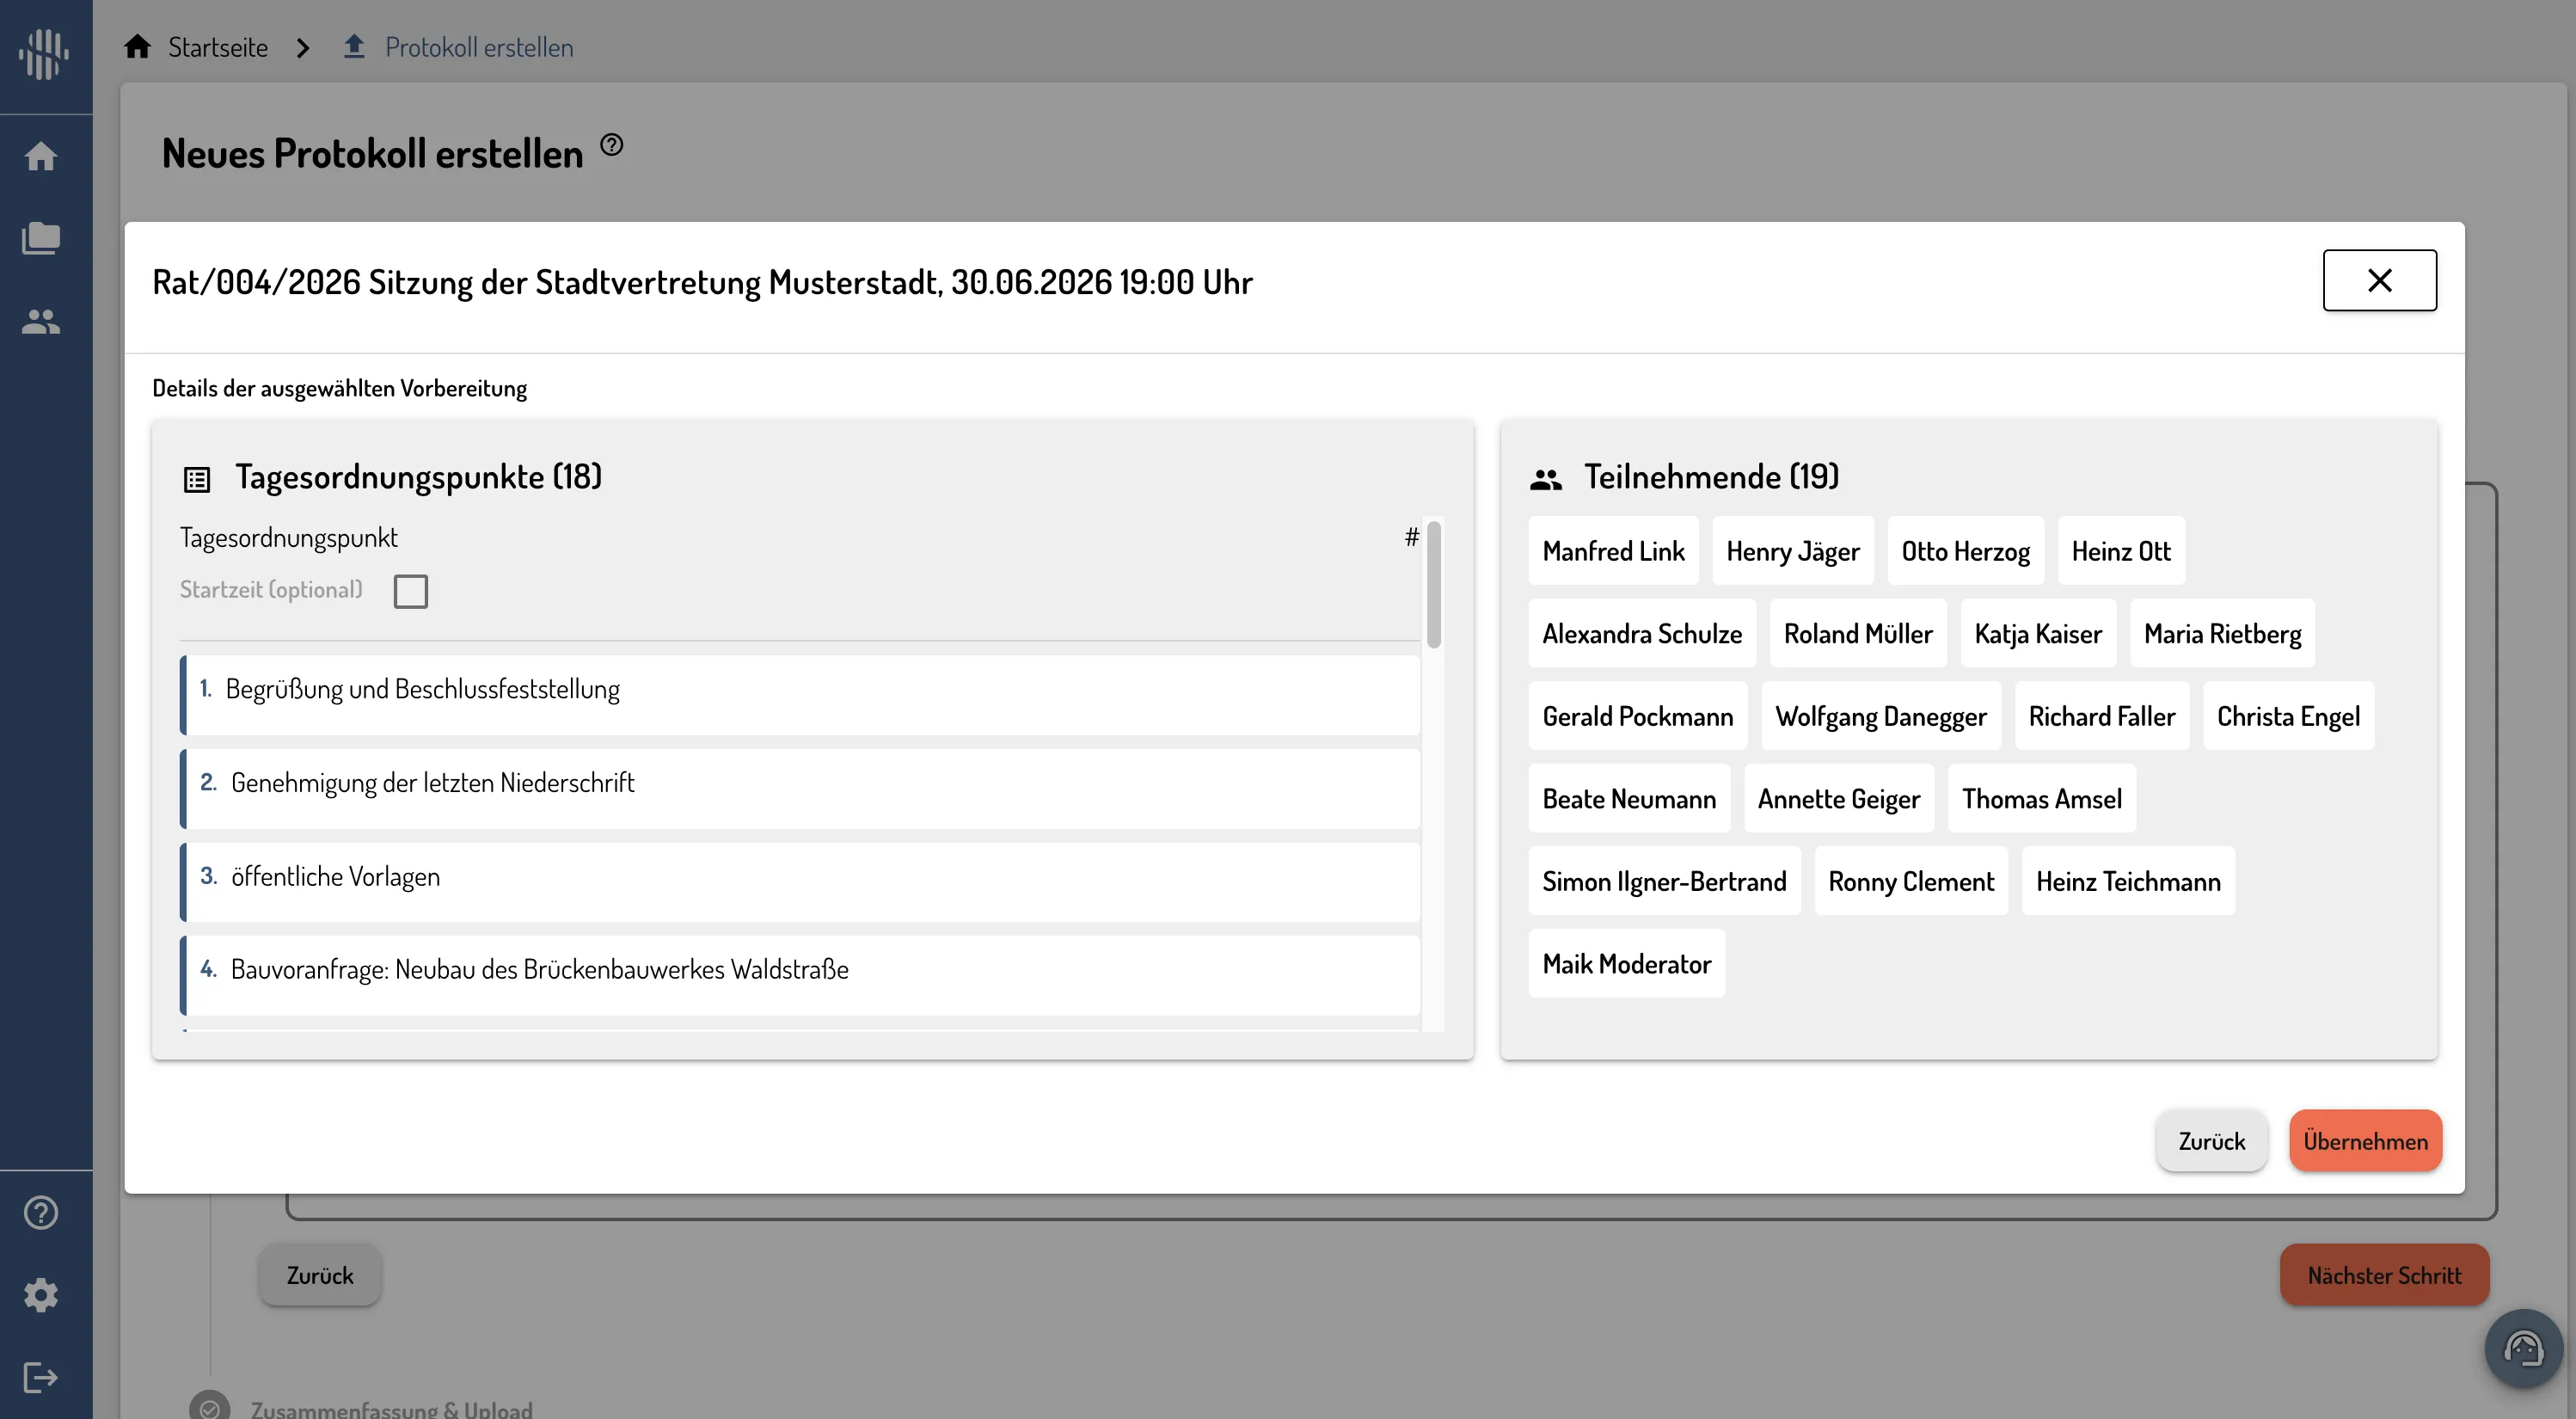
📌 Note: The agenda and participants are now attached to your protocol. You can still edit them, and participants that are stored in speaker recognition are matched automatically.
8. Technical Specifications
All RIS requests are sent server-side. SpeechMind has moved the requests to your Session provider from the client (the end users’ browsers) to server side, so every request to your Session system now originates exclusively from our server, not from individual browsers.
IP allowlisting (whitelisting)
Whether you need to do anything here depends on your Session / KI-Connector endpoint:
- Public endpoint – if your Session URL is publicly reachable, no allowlisting is required. The integration works out of the box.
- Private endpoint – if your endpoint is not publicly reachable or restricted by IP (e.g. private or behind a firewall), you need to allowlist SpeechMind’s backend so it can reach your system.
For the private case, our backend currently sends its requests from the following IP addresses:
57.129.31.13757.129.31.15157.129.31.239
📌 Note: These IP addresses are a temporary solution and are subject to change. We are working on routing all outgoing backend traffic through a single, fixed IP address, which will simplify the allowlist.
Summary
- Setup (org admin): Home → Admin Bereich → Schnittstellen → Ratsinformationssysteme → Session
- Request the WebAPI-URL and Instanznummer from your Session account manager
- Create the system configuration with the Base URL and Instanz ID → Speichern
- Usage: Protokoll erstellen → Agenda & Teilnehmende → Session
- Log in to Session → enter the Sitzungsnummer → Daten abrufen
- Review the agenda and participants → Übernehmen