

Integrations
Nextcloud Integration
Introduction
This guide explains how to set up an integration between Nextcloud and SpeechMind so that recordings stored in your Nextcloud directory are automatically imported into SpeechMind — without any manual uploads.
The setup process differs depending on your role. Please follow the section that applies to you:
- I am a Nextcloud / organization admin → Complete Admin Setup first, then Integration Setup.
- I am a regular user (non-admin) → Your admin must complete the admin setup first. Then follow Integration Setup (User).
Table of Contents
- Admin Setup (admins only — must be done before any user can connect)
- A. Creating the OAuth 2.0 Client in Nextcloud
- B. Enabling Webhooks on the Nextcloud Server
- Integration Setup — Admin
- Where you are in the software
- Adding and configuring the integration
- Connecting Nextcloud
- Important requirement for login
- Automatic import of recordings
- Viewing transcripts
- Removing the app
- Summary
- Integration Setup — Non-Admin User
- Prerequisites
- Where you are in the software
- Opening the configuration
- Connecting Nextcloud
- Automatic import of recordings
- Viewing transcripts
- Removing the app
- Summary
Admin Setup {#admin-setup}
These steps must be completed by a Nextcloud administrator before any user in the organization can connect. If either step is skipped, the webhook cannot be created and automatic import will not work for anyone.
Prerequisite A: Creating the OAuth 2.0 Client in Nextcloud
A Nextcloud administrator must create an OAuth 2.0 client in the Nextcloud admin area. This provides the Client ID and Client Secret needed to connect SpeechMind to Nextcloud.
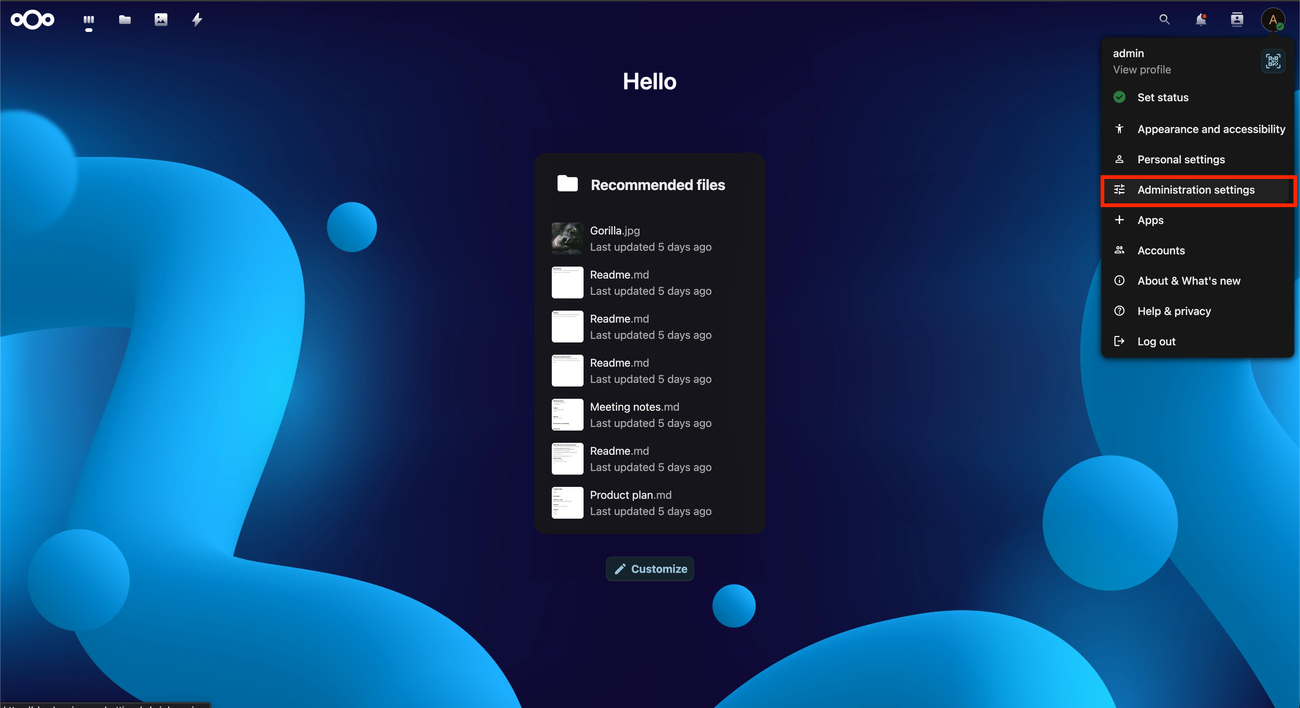
Step 1: Click on your profile icon in the top-right corner of Nextcloud and select “Administration settings”.
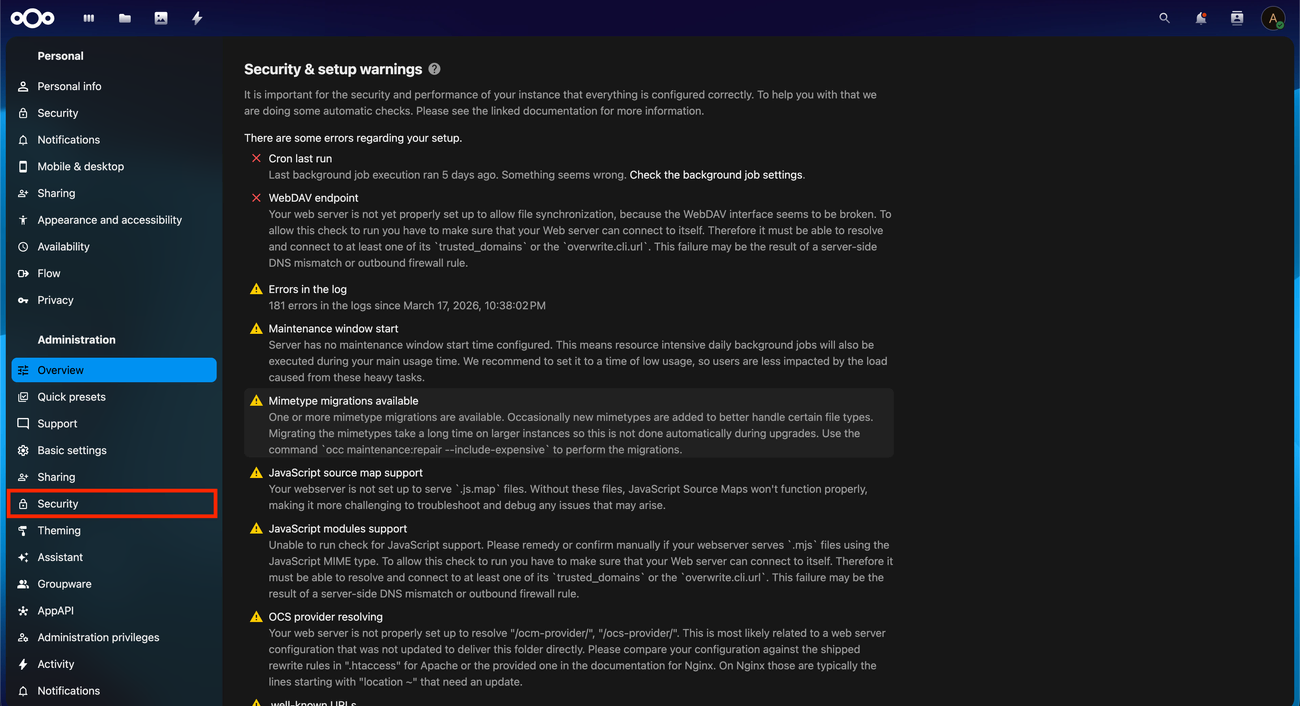
Step 2: In the left sidebar under Administration, click on “Security”. Scroll down to the OAuth 2.0 clients section.
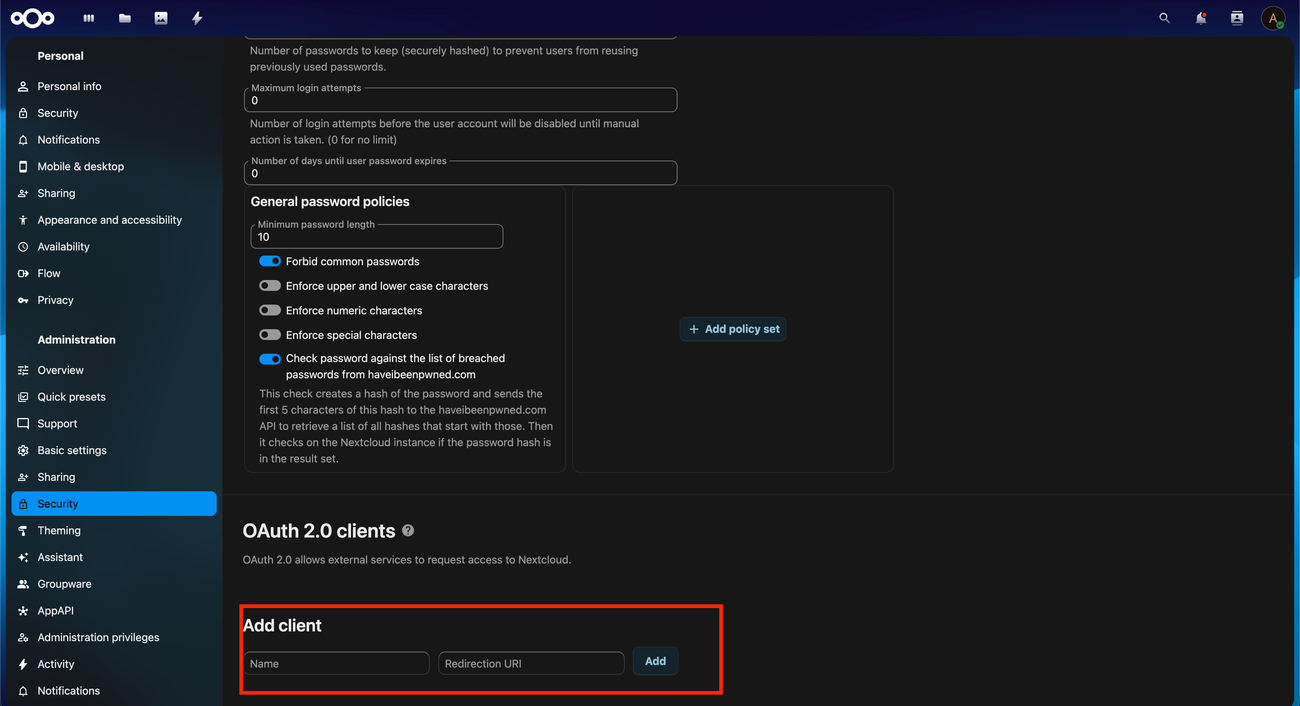
Step 3: Under “Add client”, enter a name for the app (e.g. SpeechMind) and set the Redirection URI to:
https://api-v2.speechmind.com/nextcloud/callbackThen click “Add”.
Step 4: After saving, copy the generated:
- Client ID
- Client Secret
These credentials are required during the SpeechMind setup.
📌 Note: The OAuth client must be created in Nextcloud before starting the SpeechMind setup. Without it, the connection cannot be completed.
Prerequisite B: Enabling Webhooks on the Nextcloud Server
The webhook_listeners app must be enabled on the Nextcloud server before any user connects. When a user connects SpeechMind to Nextcloud, SpeechMind will automatically register the webhook on the backend — but only if this app is already active. If it is not enabled, the webhook will not be created and automatic import will not work.
Run the following commands for your operating system.
⚠️ Before running any command, replace /your/nextcloud/path (Linux/macOS) or C:\your\nextcloud\path (Windows) with the actual path to your Nextcloud installation on your server.
Linux (run as the web server user, e.g. www-data):
sudo -u www-data php /your/nextcloud/path/occ app:install webhook_listeners
sudo -u www-data php /your/nextcloud/path/occ app:enable webhook_listeners
Windows (run in Command Prompt or PowerShell as Administrator):
php C:\your\nextcloud\path\occ app:install webhook_listeners
php C:\your\nextcloud\path\occ app:enable webhook_listeners
macOS (run in Terminal):
php /your/nextcloud/path/occ app:install webhook_listeners
php /your/nextcloud/path/occ app:enable webhook_listeners
📌 Note:
If the webhook_listeners app is already installed, you only need to run the app:enable command.
💡 Tips — Common paths by OS:
- Linux:
/var/www/html/nextcloudor/var/www/nextcloud - Windows:
C:\xampp\htdocs\nextcloud - macOS:
/Applications/MAMP/htdocs/nextcloudor/usr/local/var/www/nextcloud - If you are unsure of your Nextcloud path, contact your system administrator.
Integration Setup — Admin {#integration-setup-admin}
The following steps are performed inside SpeechMind by the admin, after both prerequisites above are complete.
1. Where You Are in the Software
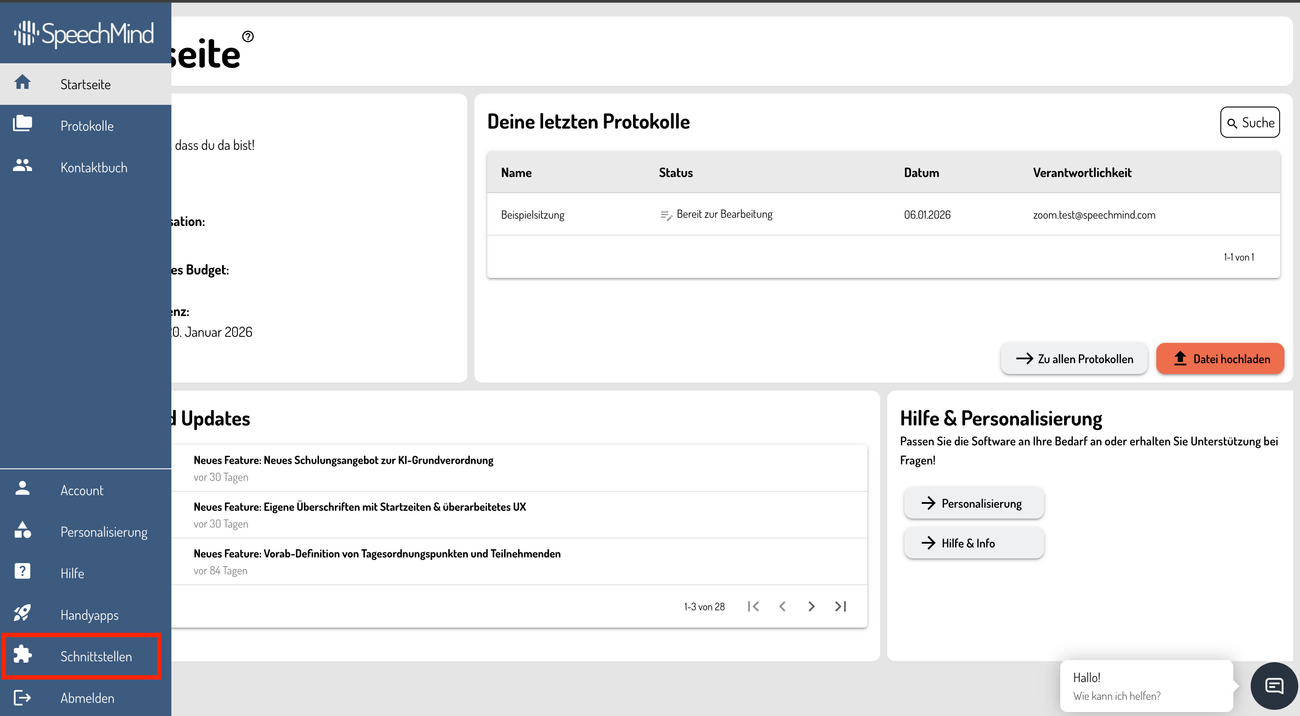
Start on the SpeechMind home page. In the left-hand menu bar, click the puzzle icon to access the Integrations page.
2. Adding and Configuring the Integration
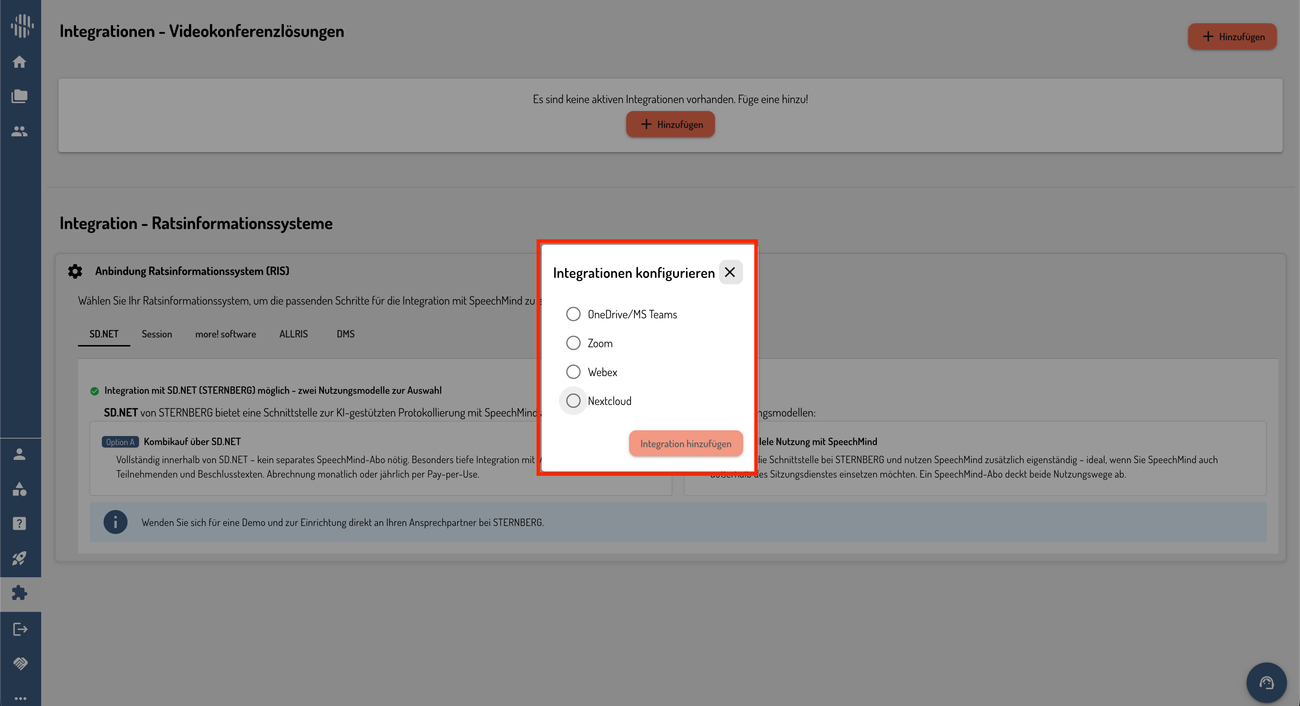
- Click the ”+ Hinzufügen” button in the top-right corner
- A popup will appear — select “Nextcloud” from the list
- Click “Integration hinzufügen” to add it
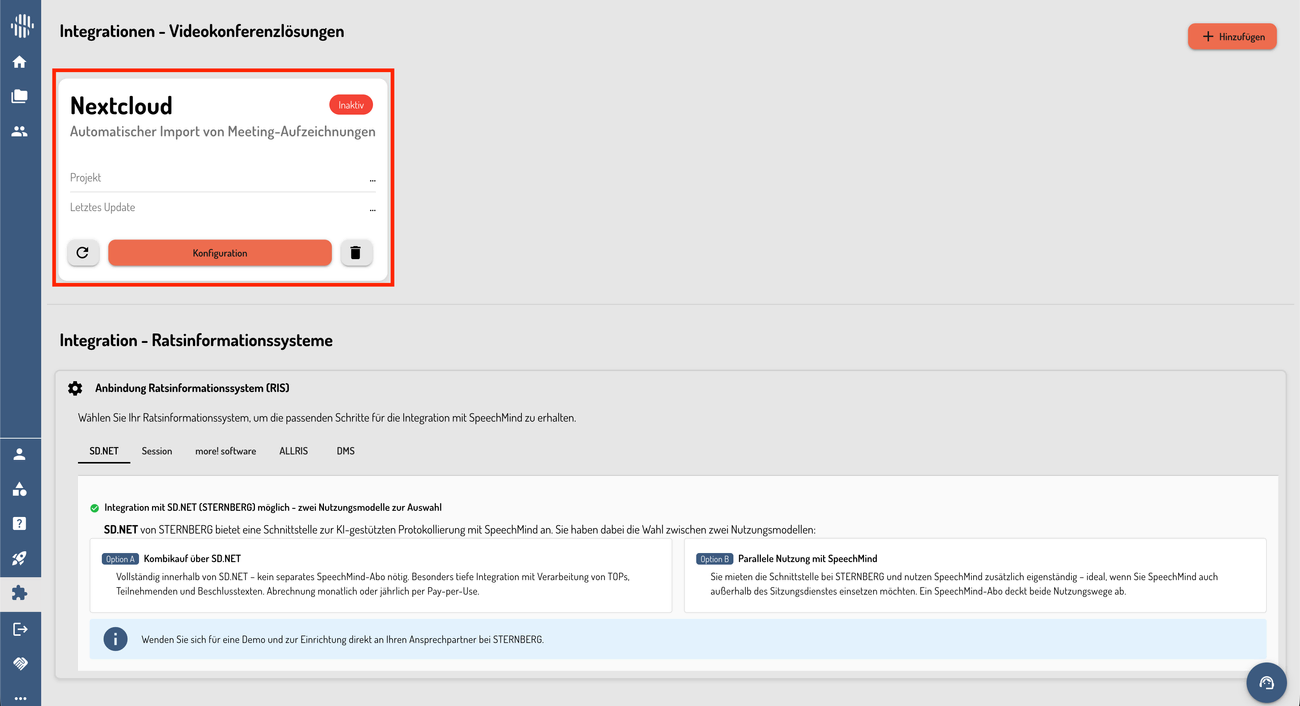
- The integration card will appear with status “Inaktiv”
- Click “Konfiguration” to open the configuration popup
3. Connecting Nextcloud in SpeechMind
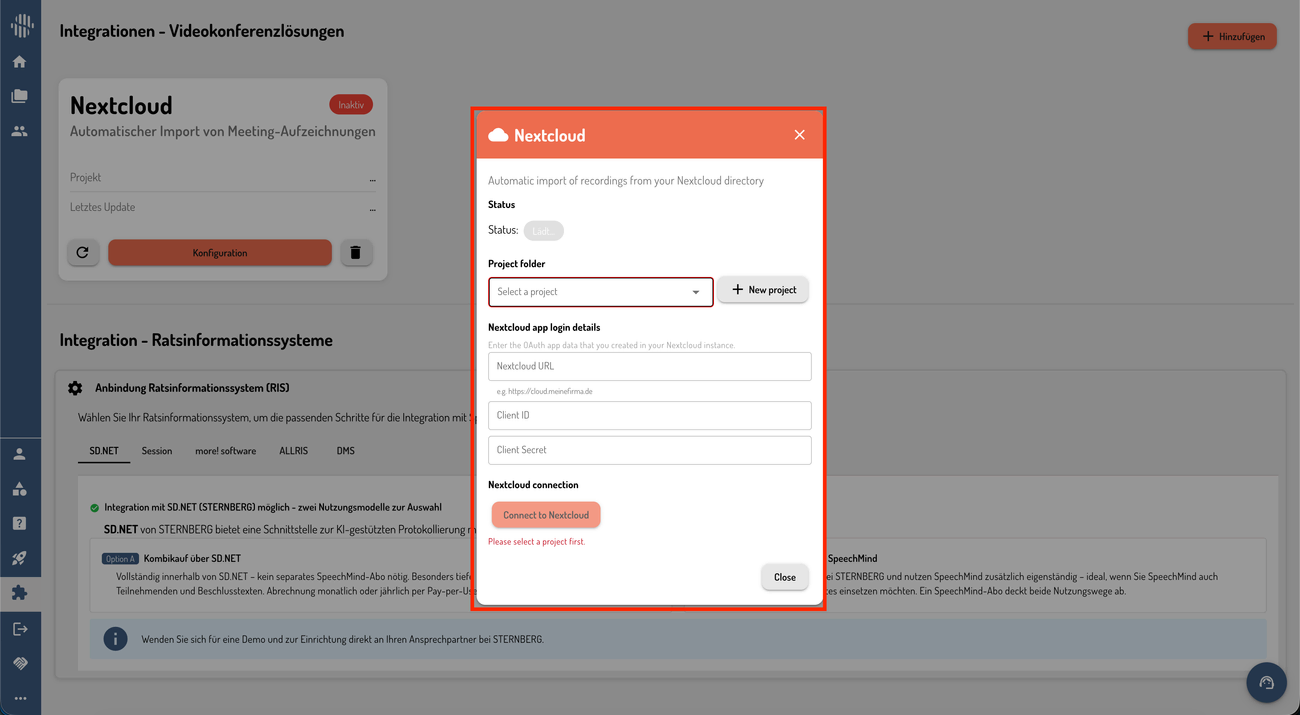
In the configuration popup:
- Under Project folder, select the project where recordings should be stored
- If you do not yet have a project, click ”+ New project” and create one
- Under Nextcloud app login details, enter:
- Nextcloud URL (e.g.
https://cloud.meinefirma.de) - Client ID (from Prerequisite A)
- Client Secret (from Prerequisite A)
- Nextcloud URL (e.g.
- Click “Connect to Nextcloud”
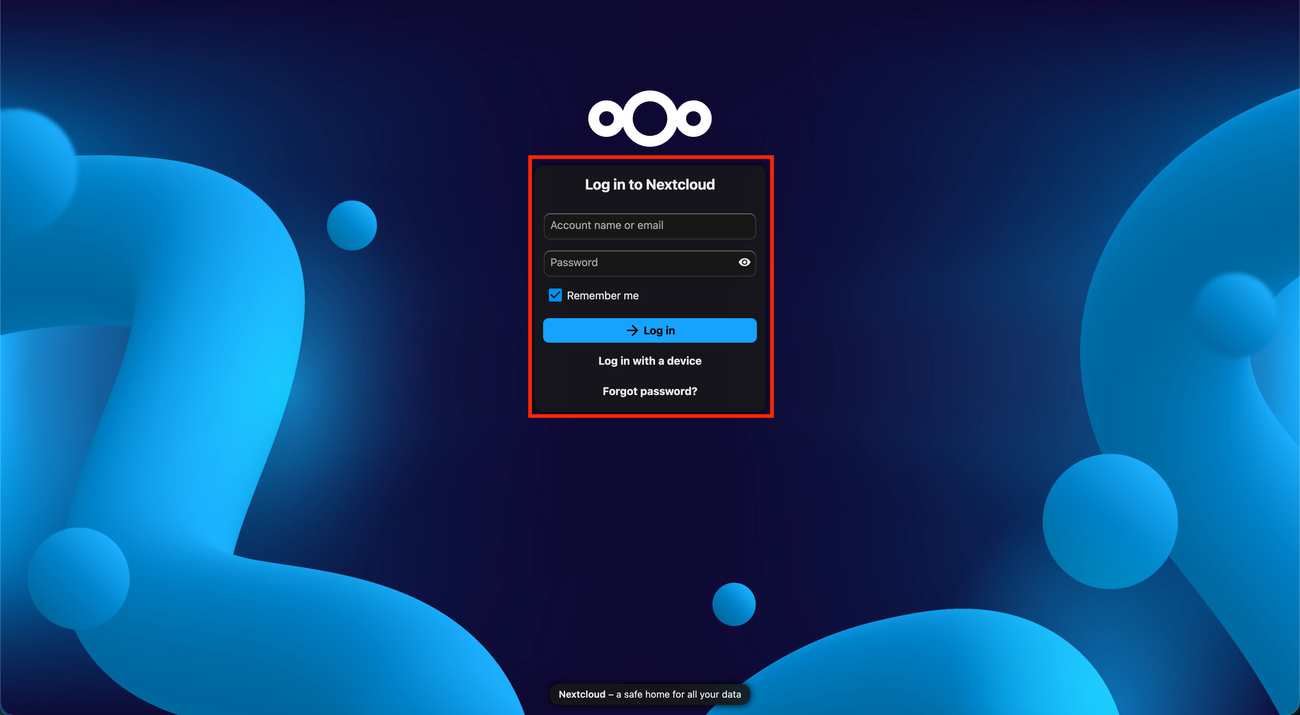
- You will be redirected to the Nextcloud login page
- Log in with your Nextcloud admin credentials
- Approve the access request
- After successful authentication, you will be redirected back to SpeechMind
4. Important Requirement for Login
⚠️ Important: While connecting Nextcloud, you must log in using the Nextcloud admin user ID and password.
- Use the admin user ID
- Use the admin password
If you do not use admin credentials, the integration will not work.
📌 Note: A normal user account is not sufficient for completing this connection successfully.
5. Automatic Import of Recordings
After successful authentication, the integration status will change to “Aktiv” and no further manual action is required.
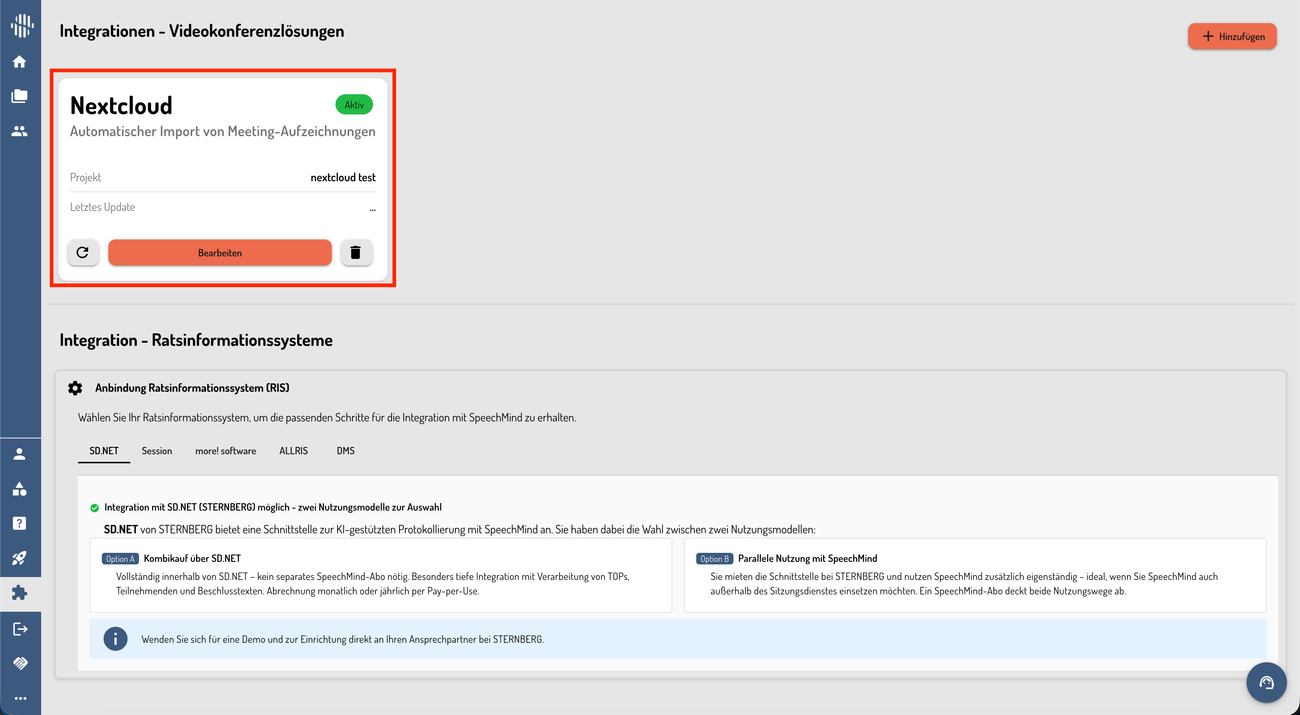
Any recordings added to the connected Nextcloud directory will be automatically detected via the webhook, imported into SpeechMind, and processed there.
📌 Note: Make sure the integration is connected to the correct project so imported files are stored in the right location.
6. Viewing Transcripts
- Go to the “Protokolle” menu.
- In “Letzte Protokolle”, you can see your most recent imported transcripts.
- You can also open Private Projects and navigate to the project you selected during setup. The imported recordings and corresponding transcripts will be available there.
7. Removing the App
To remove the Nextcloud integration:
- Go to your Nextcloud integrations in SpeechMind.
- Click the Delete (🗑) button next to the Nextcloud integration card.
- If needed, also remove or revoke the OAuth client from the Nextcloud Admin → Security area.
📌 Note: Removing the integration in SpeechMind automatically disconnects the webhook on the backend. No manual webhook cleanup is required.
8. Summary (Admin)
- Go to Profile → Administration settings → Security in Nextcloud
- Under OAuth 2.0 clients, add a new client with this redirect URI:
https://api-v2.speechmind.com/nextcloud/callback- Copy the Client ID and Client Secret
- Enable the
webhook_listenersapp on the Nextcloud server using the commands for your OS
⚠️ Replace /your/nextcloud/path (Linux/macOS) or C:\your\nextcloud\path (Windows) with the actual path to your Nextcloud installation before running these commands.
Linux:
sudo -u www-data php /your/nextcloud/path/occ app:install webhook_listeners
sudo -u www-data php /your/nextcloud/path/occ app:enable webhook_listeners
Windows (Command Prompt or PowerShell as Administrator):
php C:\your\nextcloud\path\occ app:install webhook_listeners
php C:\your\nextcloud\path\occ app:enable webhook_listeners
macOS (Terminal):
php /your/nextcloud/path/occ app:install webhook_listeners
php /your/nextcloud/path/occ app:enable webhook_listeners
💡 Common paths: Linux: /var/www/html/nextcloud · Windows: C:\xampp\htdocs\nextcloud · macOS: /Applications/MAMP/htdocs/nextcloud
- Click the puzzle icon → ”+ Hinzufügen” → select Nextcloud → “Integration hinzufügen”
- Click “Konfiguration” on the card
- Select the target project
- Enter the Nextcloud URL, Client ID, and Client Secret
- Click “Connect to Nextcloud” and log in with admin credentials
- Status changes to Aktiv — recordings import automatically
Integration Setup — Non-Admin User {#integration-setup-user}
If you are a regular user (not a Nextcloud administrator), follow these steps. The admin setup above must already be complete before you proceed.
1. Prerequisites
Before you begin, confirm the following:
- Your organization’s Nextcloud administrator has already completed the admin setup above (OAuth 2.0 client created and
webhook_listenersapp enabled). - You are a member of the same organization in SpeechMind as the administrator.
- You have a valid Nextcloud user account within your organization’s Nextcloud instance.
📌 Note: If you are unsure whether the admin setup has been completed, contact your Nextcloud administrator before proceeding.
2. Where You Are in the Software
Start on the SpeechMind home page. In the left-hand menu bar, click the puzzle icon to open the Integrations page.
3. Opening the Configuration
On the Integrations page, the Nextcloud integration card will already be listed — added by your organization admin. The card will show a status of “Inaktiv”.
Click the “Konfiguration” button on the Nextcloud card.
4. Connecting Nextcloud
Inside the configuration popup, you only need to do two things:
- Under Project folder, select the project where your imported recordings should be stored.
- If you do not yet have a project, click ”+ New project” to create one.
- Click “Connect to Nextcloud”.
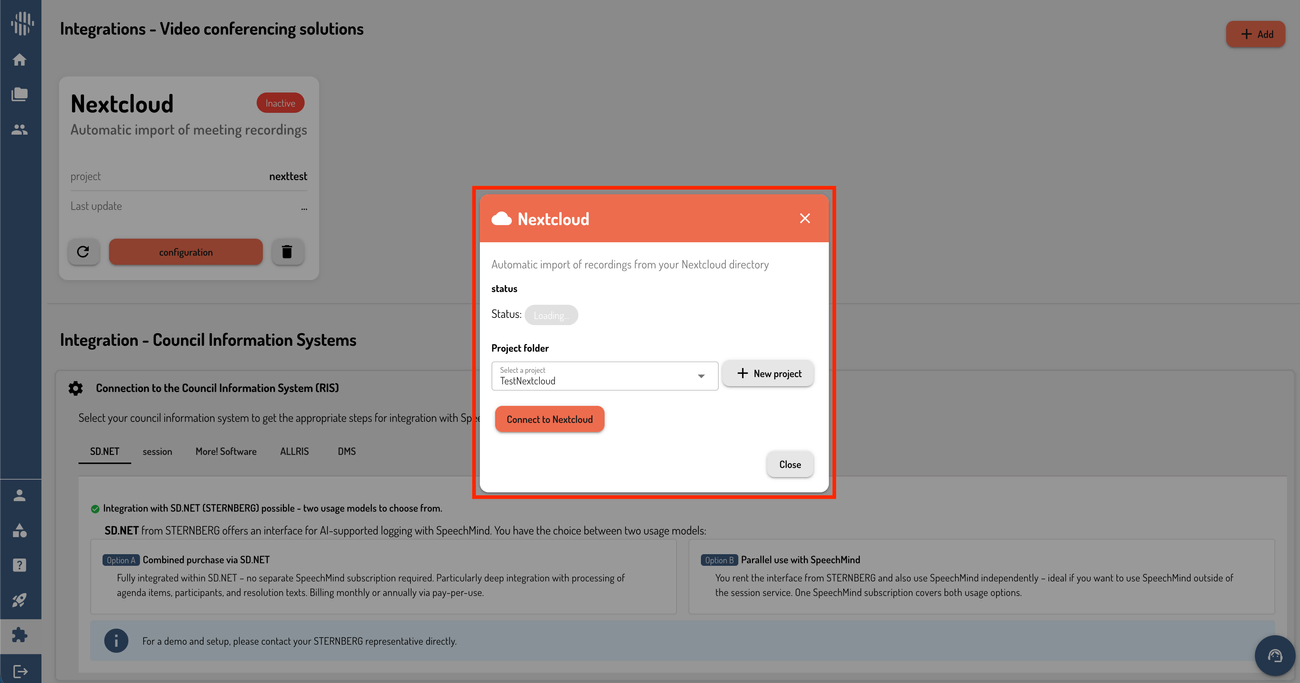
You will be redirected to the Nextcloud login page. Log in with your own Nextcloud credentials (your regular username and password — no admin access required). After a successful login, you will be automatically redirected back to SpeechMind.
📌 Note: You do not need to enter a Nextcloud URL, Client ID, or Client Secret. These are pre-configured by your organization’s administrator.
5. Automatic Import of Recordings
After successful authentication, the integration status on the card will change to “Aktiv”. No further action is needed.
Any recordings added to the connected Nextcloud directory will be automatically detected, imported into SpeechMind, and processed — without any manual uploads.
6. Viewing Transcripts
- Go to the “Protokolle” menu in the left sidebar.
- In “Letzte Protokolle”, you will see your most recently imported transcripts.
- You can also open Private Projects and navigate to the project you selected during setup — all imported recordings and transcripts will appear there automatically after processing.
7. Removing the App
To disconnect the Nextcloud integration:
- Go to Integrations in SpeechMind.
- Click the Delete (🗑) button next to the Nextcloud integration card.
📌 Note: Removing the integration automatically disconnects the webhook on the backend. No manual cleanup in Nextcloud is required.
8. Summary (Non-Admin User)
- Make sure your organization admin has already completed the admin setup.
- Open Integrations from the puzzle icon in the left menu.
- Click “Konfiguration” on the Nextcloud card.
- Select the project folder where recordings should be stored.
- Click “Connect to Nextcloud” and log in with your own Nextcloud credentials.
- Status changes to Aktiv — recordings will import automatically.
📌 Note: You do not need a Client ID, Client Secret, or Nextcloud URL. Your organization administrator has already configured those.
Have questions?
Still have questions? Talk to support.